K9 Rebuild/Upgrade

Energy One

Mickmorris

Well Known Member
Supporting Member
Appreciate it...really do. I'm sure there was something that went back together easy, but I swear I can't remember what it was. What I remember is everything that DIDN'T go back together easy! I will say this, I feel pretty good about the rebuild. Although many things I had to do two or three times to get it right. Looking at the bike I think I could finish everything in two or three days if I had the rest of the parts. I'll check on the fenders next week and Space Coast said they'll be finished around 5th December. Almost finished with the rear brake caliper...polishing it up now. My back is killing me! What I've learned the most is that it's alot more fun riding this thing than working on it!
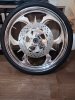
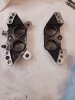
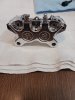
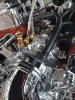
You’re doing a fantastic job! I have thoroughly enjoyed following along on your journey! Keep up the good work and make sure you have someone take a video when you go on the first ride!!
:chopper: :cheers::patriot:
 
Last edited:

82ndAirborne

Active Member
Supporting Member
Thanks Mick...you guys have been with me all the way on this. This is a list of what's left.
1. Install Front Wheel
2. Rebuild Front Brake Caliper (Then install)
3. Install Rear Brake Caliper
4. License Plate
5. Kickstand
6. Speedometer (Bezel was scratched-rechrome
7. Front Fender
8. Rear Fender & Tail Light wires
9. Brake side Forward Control
10. Transmission Cover & Switch
11. Air Ride Components & Wires
12. Bleed Front & Rear Brakes
13. Install Front Rocker Box Cover
14. Install Oil Cooler & Stash Tube
15. Cam Cover

Seems like quite a list but most of it installs easily...I hope! I've purchased everything that goes inside the primary and plan to let my paint guy install it all for me. While he's doing that I'll send the Primary Outer Cover for rechroming. I've got a new Inner so he can start the work. I'll keep the bike in storage until he's ready to install it, also he'll do the frame touch up. Last thing I hope to get is the FSD Exhaust...we'll wait and see about that. Finally, I'll take it for the Ceramic Coating. I expect it will be at least March before its all done. That puts me close to riding season! I've gone completely through this bike, everything was either purchased new, rechromed, or rebuilt...every bearing, bushing, and bolt. If the weather holds out I'll try and get a few more weekends of work in before I take it to storage.
 

82ndAirborne

Active Member
Supporting Member
That looks just like the one he did for me not long ago. Runs like a champ once dialed in.
Snag a set of these to make those jet changes a bit easier. Plus they look pretty slick.

Really appreciate you turning me on to the brass bolts...like you said, they really do look good as well as helping to change out jets. I've never noticed these before. Got the front wheel mounted and the Shifter side Forward Control.
 

Attachments

82ndAirborne

Active Member
Supporting Member
Bad News/Great News: I stopped by my paint guys shop this afternoon thinking he'd be at least half way finished with my fenders and battery box covers. Well...the bad news is that he hasn't even started. The bike he's working on before mine ended up with about 20 problems instead of one. He probably won't be able to start on mine for at least three weeks, and he has the flu. However, while talking with him I finally asked him to give me a ballpark estimate on the cost. He told me $1,000! Now, this is absolutely ridiculous. He likes cash for his services and I have set aside $6,000, thinking it would probably be around $5,000. The front Fender has a scratch and the whole underside has rust. The rear fender has a 1 1/4 rust spot that went all the way to the metal. Finally, the battery Box Covers are new, never painted. Now, all of this will have to be painted black, then air brush flames. So the ridiculously low price is basically him feeling bad for taking so long. I told him "no way, you're going to charge me for ALL your time on this job." Still, I think he'll probably charge $2,500-$3,000. That's half of what I expected. Next, got my Chrome package today so I can finally install the Forward Controls. Question: How do you determine the Banjo Bolt length to use. I have three different lengths. The Big Dogs use a short bolt. This is a BDL Control.
 

Attachments

kickstart

Well-Known Member
How to determine Banjo Bolt Length? I have a BDL Tribal Forward Control, trying to determine the correct length for the Banjo Bolt. I read the attached article, don't have a clue what they're talking about. Appreciate any help on this.
It's telling you need to measure the threaded portion of the bolt.
 

82ndAirborne

Active Member
Supporting Member
I did the whole swingarm assembly...shaft & Bushings while I had it apart. I've got most of the chrome done, except the primary inner/Outer. I'll get that done in a month or so. It's coming along pretty good.
 

Ivica88

New Member
I've been searching for another right side open primary and while at PCBW I might have found someone that could or would make us open belt drives. But long story short, there is a guy in Germany, I have his FB and web site, he has a CNC shop and while at PCB I talked with this man about building open primaries for our bikes. Told him about Bakers open belt drives and he mentioned if I sent him the motor plate or any other part that he could make them. The only question I have is how is the offsets done on the motor plates and do we want a Baker style belt drive again? or do we worked something out with Karata if anyone can get ahold of anyone there.
I'm interested for open belt primary long time ago,so this will be great if someone can make them on CNC machine.So I hope the Baker style will be ok,wider belt 3" minimum..keep updated if you have some news.I'm so hopefull
 

82ndAirborne

Active Member
Supporting Member
Thus is the guy in Italy that I sent my seat and Sissy Bar Pads to. He does some pretty amazing work.
 

Attachments

82ndAirborne

Active Member
Supporting Member
I thought so too. He's got my seat now (solo). Pic 1 is the design I want with a few modifications. I want to leave the lettering off and delete a couple items from the very bottom. Then, where the Hueys are up on the left, I want him to replace that with a version of Pic 2 or Pic 3...whatever works best. He'll do a drawing first for approval before he starts. Then he's going to do two different versions of the Sissy Bar Pad Pic 4 (One of the ribbons was missing but I sent it to him). I REALLY hope he can get the detail. Looking at his stuff I believe he can pull it off.
 

Attachments

Top