
K9 Rebuild/Upgrade
- Thread starter 82ndAirborne
- Start date

You know how it is when you're installing something new, they sometimes send Bolts or other pieces that don't fit you're bike, you just put them back in the box and move on. It should have occurred to me when I saw an item made of plastic that there was a special need for this particular item. I NEVER throw pieces away, even old parts I generally hang onto. Thanks again. Had a chance to polish the Intake while everything was out of the way. Cleaned the fins from the inside also. Didn't realize how bad they were. If John can tell me how to swap that out I should be able to get everything back together tomorrow.
john sachs
Well-Known Member
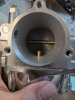
Don't mess with it. Use the stock S&S emulsion tube., like what your new carb has. Jet the new carb properly, and call it a day. Any new Mods ? Bore the carb, and maybe a Thunderjet, and try a different air jet.With the Ignition Cover removed, the bolts to the Carburetor are easily accessed. It looked ALOT more difficult than it actually was. Not sure what this is called (Pic 2), but it is not installed on the new Carburetor. Question: How is it removed/replaced? Is there a bolt inside the bowl cover?

So you're saying that nothing attaches here? Just reset per your earlier instructions?
Attachments
-
 98.2 KB Views: 18
That looks just like the one he did for me not long ago. Runs like a champ once dialed in.So you're saying that nothing attaches here? Just reset per your earlier instructions?
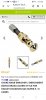
Snag a set of these to make those jet changes a bit easier. Plus they look pretty slick.

S&S SUPER E AND G CARB EXTENDED FLOAT BOWL SCREWS - BRASS - Lowbrows Custom
Anyone who has ever had to make several jet changes, or drop their float bowl on the side of the road knows how difficult to reach stock float bowl screws can be. Our Extended Float Bowl Screws solve this issue. Included in this set are four brass hex head extended screws with steel threads...
 lowbrowecustoms.com
Excellent! I just ordered a set. Very convenient and like you said, they look great! I found a shop just over the Florida line that has a DYNO. When I'm done with everything I plan to make the trip. It's about two hours...not too bad. I don't expect to be finished for several more months.
No...I'm in Georgia now, little town right outside Savannah. If I recall correctly that shop is a little south of Brunswick,Georgia.
When I bought my bike the guy I bought it from really loved it. Honestly, he was a huge guy, probably 6'-4", I could have sworn at one point I saw a tear in his eye. Medical/financial problems forced him to sell. Like a real dog, he really wanted it to go to a good home. Well, he found one in me. I love this bike just as he did. One of the first things he told me about was the 'Forum'. So, initially I didn't think too much about it but I remember thinking that I should join. Man, was that a great decision! Collectively you guys have came to my assistance on EVERY problem I've encountered. There's NO DOUBT that you've solved dozens of problems and prevented me from making numerous mistakes. Something as simple as installing a plastic washer to prevent heat build up, or removing a plug on the Carburetor when installing the Spike Air Filter. These small but highly significant pieces of information make the difference between simply completing a job, and doing it RIGHT. You don't get this information from a book or even a Tech rep at any of the parts distributors. There's only one place that provides this...YOU GUYS. So, I just wanted to take a moment to acknowledge your contribution to this build and to say "Thanks".
Yeah to a point.Isn't the coil cover bolts a conductor? ?
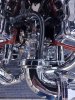
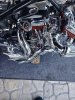
Got the carb installed today, also the Arlen Ness Oil Press Gauge. The line on the gauge was too long so I'll have to get it modified. All went well. Removed the tank so I can retie the wiring. I'll try to get that done next weekend. I'm hoping space coast will finish my items this week and get them back to me so I can get the Forward Controls mounted. Still polishing the Front Wheel assembly...don't want to rush that. So, that's it for this weekend.
Attachments
-
 197.7 KB Views: 18
 -
 250.6 KB Views: 19
To install, do I just unscrew the old one replace? Also, though the brass would look good with the brass float bowl screws you showed me.That looks just like the one he did for me not long ago. Runs like a champ once dialed in.
Snag a set of these to make those jet changes a bit easier. Plus they look pretty slick.
S&S SUPER E AND G CARB EXTENDED FLOAT BOWL SCREWS - BRASS - Lowbrows Custom
Anyone who has ever had to make several jet changes, or drop their float bowl on the side of the road knows how difficult to reach stock float bowl screws can be. Our Extended Float Bowl Screws solve this issue. Included in this set are four brass hex head extended screws with steel threads...
Attachments
-
 63.7 KB Views: 12
Yep. Screw the old one out. Put the new one in.To install, do I just unscrew the old one replace? Also, though the brass would look good with the brass float bowl screws you showed me.
Great. Appreciate it.
Well guys it's been a month now since I received the call from Frankie Serrano at FSD...no other contact. He said he would be in operation within two weeks. So...??? I'm stuck for the moment waiting for items from the paint shop and chrome items from Space Coast. I've got the front wheel all polished up and ready to go on, I'll probably do that tomorrow. I'm working on rebuilding the brake calipers. My GOD these things are hard to get apart (pistons). I imagine they've never been taken apart so there's about 20 years of soot inside and the pistonswere all stuck. I've got 3 of the 4 pistons out, the 4th is coming out slowly. Being really careful not to damage anything. I have to admit, this Rebuild has been a VERY DIFFICULT and time consuming job but I'm getting close to having it all back together again. I still don't have the exhaust/carb tuned correctly. The front cylinder appears to be running richer than the rear. Because of Winter I've decided to concentrate on simply getting everything else done and do adjustments later. Also, not knowing whether I'll get the FSD exhaust, it would be a waste of time trying to tune the BLOW and then everything change with the FSD. As I mentioned, Winter is here so the plan is to get the front wheel and front Brake installed tomorrow. This will allow me to load it onto a trailer and get it into a climate controlled storage unit while I wait for the remaining parts. I still have to send the bike to the paint shop for frame touch ups so it may be January before he has a slot open.
Unfortunately I don't have a compressor here...back home in Kentucky. Man these things are nasty. It's going to take all day to clean them up. I took them off about 9 months ago and I guess everything dried up and stuck. Good news is that these are the last items to clean up. My seat and back rest arrived in Italy yesterday. Looking forward to the design he draws up for me.
Appreciate it...really do. I'm sure there was something that went back together easy, but I swear I can't remember what it was. What I remember is everything that DIDN'T go back together easy! I will say this, I feel pretty good about the rebuild. Although many things I had to do two or three times to get it right. Looking at the bike I think I could finish everything in two or three days if I had the rest of the parts. I'll check on the fenders next week and Space Coast said they'll be finished around 5th December. Almost finished with the rear brake caliper...polishing it up now. My back is killing me! What I've learned the most is that it's alot more fun riding this thing than working on it!