Also, I tried inserting two short Bolts to pull the Rotor off...couldn't do it. So, installed two long Bolts with large washers...came off with ease!
Attachments
-
 145.2 KB Views: 0


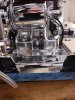
You need to remove the weight on your Ignition key.Ok...here we go with Primary swap. So, I'm looking at picture 2, I would like to remove the clutch basket as a single unit.
(From my manual)
CLUTCH BASKET/ENGINE SPROCKET/PRIMARY CHAIN-REMOVAL AND INSTALLATION
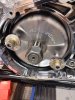
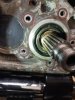
I see a Retaining Ring holding the Throwout bearing. The manual skips right over removing this and goes straight to removing the clutch hub Nut. I assume this is a simple oversight and I'll find the nut behind the bearing. Is this correct?
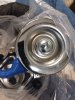
Can I insert the plug and afterward Seat the Stator, or does it need to be fully seated BEFORE inserting the plug? There's not alot of finger room once it's fully seated.Three thoughts on the stator plug: obsessively clean the housing, use high quality sealant and allow a day to cure. Sounds like you’re good for all 3.
Looks like he hooks it to a spark plug wire.You need to remove the weight on your Ignition key.

You're correct...Seal (orange looking in pic 1) I see now that when I put the clutch hub back on it will push the seal back in on the shaft. The larger outer seal is not leaking. However, since I already ordered the kit I may as well use it. Also, I can't finish the project now anyway because of the starter. So, I'll just clean things up.Huh—-my K9 also leaks a dribble of trans oil when I pull the clutch but my trans never requires any oil to be added. See if there is any end play in the input shaft—it should be rock solid. Check your trans oil level. Im in FL this weekend and don’t have access, but I think the clutch inner hub is sealed by a rubber inner lip on the transmission seal. When you remove the hub and spline (#21) from the transmission input shaft, it allows a bit of oil to seep out. Bet $10 your trans input seal is ok and the seepage normal.
No, it's just hanging down...it's a BIG Dog key ring...Think I got it from Curtis. You think it'll damage my key switch?Looks like he hooks it to a spark plug wire.
Keep it clipped to ur sparkplug. Not enough weight to do any damage.No, it's just hanging down...it's a BIG Dog key ring...Think I got it from Curtis. You think it'll damage my key switch?
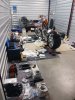
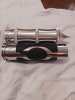
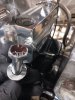
Ah...think I know how that starter Housing got trashed. Someone already mounted this on the Primary. I was just reading a post on the Rotor/Stator install, sometimes requiring a little grinding on the fins. If they were doing this on concrete, with the starter mounted...well...you get the picture. It would have to be something like this to scratch both back and sides.Though I would lay out the parts for the Inner Primary, Starter...etc. Basically make sure I have everything. So, opened up the box on the starter and started to pull it out of the plastic. OMG...it's deeply scratched all around the back housing. Looks like someone tried installing it with a chain saw! I know Donna will replace it but yet another unexpected delay. If it didn't show I would go ahead and use it but this is the exposed end and it's scratched all the way around...even the back side of the lip. Crap!
Look what I found reading the Chapter you emailed to me...(Note at top)! So...nothing to worry about. I think I'll replace the two seals anyway since I already ordered the kit. Looks like the one on the shaft just slides on; the larger seal I believe I can just gently press it in.Huh—-my K9 also leaks a dribble of trans oil when I pull the clutch but my trans never requires any oil to be added. See if there is any end play in the input shaft—it should be rock solid. Check your trans oil level. Im in FL this weekend and don’t have access, but I think the clutch inner hub is sealed by a rubber inner lip on the transmission seal. When you remove the hub and spline (#21) from the transmission input shaft, it allows a bit of oil to seep out. Bet $10 your trans input seal is ok and the seepage normal.