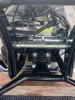
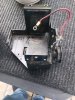
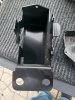
K9 Rebuild/Upgrade

Snuffy

Active Member
Supporting Member
There ar
The dual mount is exactly what I want. I'd like to have them match in size (Oil, air). Do you know of a shop that would build me one? I've got an extra Rocker box I could send so they could get the right specs on Mounting. Also, I could purchase the gauges from the same manufacturer so they would match.
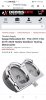
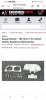
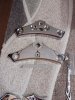
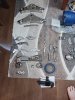
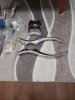
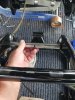
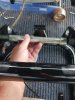
There are talented people on here who could make that.
 

82ndAirborne

Active Member
Supporting Member
Did you ever get your blow exhaust?
Not yet. I'm hoping that after your conversation with Andrew he actually tried to install mine on one of the K9s in his shop. I ordered several other items from him as well but haven't received anything. I assume he wants to ship everything together. Regardless, I still want the FSD if possible so I'll keep trying. I'm going to check with Curtis to see if he's interested in making the gauge bracket. Even before I purchased the air ride components I always wanted a dual gauge setup for Oil pressure/oil temperature. Perhaps if several guys wanted one it would be more cost effective to produce.
 

82ndAirborne

Active Member
Supporting Member
Got all the chrome back from Spacecoast today. Absolutely BEAUTIFUL job. Everything looks amazing. Took me 3 hours to reassemble the headlight...there was a little bit of excess chrome in those tiny set screw holes. The Hand controls look like 100 tiny pins and spacers to reassemble...didn't know that many pieces were inside. I think they'll be the most difficult to put back together. I had the swingarm bushings pressed in/out yesterday...pickup tomorrow. So, looks like I'm ready to begin reassembly. Still haven't received the Speedometer and exhaust from Andrew???
 

Attachments

82ndAirborne

Active Member
Supporting Member
I'm going to wrap everything in painters tape for assembly so I don't scratch anything. I still have to send the primary and a few other items to Spacecoast. I'd like to have the carb chromed... they told me to send a picture. I originally wasn't planning to chrome the triple trees and Hand controls but the Tribal Forward Controls looked so good I'd thought everything would match up better. I pray that nothing gets damaged before I can get the Ceramic Coating applied. Also, I guess if the BLOW EXHAUST doesn't work out I'll just get another set of V.H.
 

82ndAirborne

Active Member
Supporting Member
I picked up the swingarm yesterday and started installing this morning...problems. Both shafts (Pic 1 & 2) were too long. I tried inserting a reverse Clamp, to spread the arms out a little. I quickly realized that I would pit too much stress on the welds but also have clearance issues when I tried to insert the swingarm into the frame. So, I removed the adjustment Nut on the new swingarm shaft (Pic 3)...I had clearance. Examining the Nut I saw that there was about 3/16" of solid material before getting into the threads (Pic 4). I got my Dremmel Tool out with a cutting wheel and I'm cutting off 1/8" or so. I'll the 1/8" first, then cut more if necessary. While I had everything off I also put in new bump stops and Oil tank bushings. I hope to never have to do this again for a long, long time. I'm going to order a few more items from Donna... I need a new Front Brake Master Cylinder Rebuild Kit. I hope one of you can help me when I try to put that Kit in.
 

Attachments

82ndAirborne

Active Member
Supporting Member
Cut the adjustment Nut down 1/8"... wet sanded and polished the end (Pic 1). Fit perfectly, allowing about 1 1/2 turns to snug it up to the bushings ((Pic 2). Got it in...done ( Pic 3). Wow, what a day. Tomorrow, if my back is up to it I'll put the oil tank and battery Box in. I had the transmission cover chromed, but I think I'll put in in after fighting all the wires on the battery Box. Does anyone know if I can install the air ride components (compressor and solenoid) after the battery Box is in??? Basically my question is would the battery Box have to come back out to install the components?
 

Attachments

Snuffy

Active Member
Supporting Member
You should know by now that nothing is easy. You will probably have to put the battery box in and out many times to fit everything in there. Best of luck with it all.
 

82ndAirborne

Active Member
Supporting Member
Looks like I made a mistake installing the swingarm shaft. (Pic 1) is INCORRECT! Luckily my manual was sitting by my chair this morning I decided to recheck the torque values on the Pivot Bolts. While doing that I read an IMPORTANT Note (Pic 2)...the adjustment Nut goes in the LEFT Side! Crap! So, I spent the early morning correcting my mistake. (Pic 3).
 

Attachments

SKOGDOG

One of the old ones.
Looks like I made a mistake installing the swingarm shaft. (Pic 1) is INCORRECT! Luckily my manual was sitting by my chair this morning I decided to recheck the torque values on the Pivot Bolts. While doing that I read an IMPORTANT Note (Pic 2)...the adjustment Nut goes in the LEFT Side! Crap! So, I spent the early morning correcting my mistake. (Pic 3).
I’ve always done very job on my K9 twice. It’s called overlearning.That way you know better next time haha
 

82ndAirborne

Active Member
Supporting Member
I’ve always done very job on my K9 twice. It’s called overlearning.That way you know better next time haha
You can say that again! Well...I got the oil tank back in and thought I would try to get the battery Box in before the rain. NOT HAPPENING. I ordered a new battery Box but got the wrong one. Im sure it was my fault. The last order to Donna was 52 items, guess I didn't pay enough attention. I'm also missing the spacers that go inside the fork tubes...looks like they're about 6" long. I could use the spacers from my old forks but I was hoping to keep them together as a complete working set. More delays...but making progress. I can at least install the triple trees and also the oil Lines while I wait on Parts.
 

Attachments

82ndAirborne

Active Member
Supporting Member
I'm preparing to rebuild the Front Brake Master Cylinder. Waiting on the kit from Donna but thought I'd examine things first. There are several Rubber bushings (plunger) that are part of the Cylinder assembly. As I look down into the Cylinder, the walls appear rough...probably oxidation. Question: Should I try to polish this out, get it smooth? I'm afraid if I don't, the rubber bushings won't seal properly as the plunger goes in and out...basically leak fluid.
 

82ndAirborne

Active Member
Supporting Member
What would you recommend as a cleaner? I was thinking several light coats of Mother's aluminum polish...wipe down thoroughly, then spray and wipe several times with carb cleaner. I know I have to be careful about scratches and also take care to completely remove all the remaining polish. By the way, for anyone who needs to rebuild a Master Cylinder, there's an EXCELLENT assembly diagram in the manual. Several illustrations can also be found online, however the ones I found don't show the individual parts clearly...USE THE BOOK!
 

82ndAirborne

Active Member
Supporting Member
That cylinder is very narrow...about the diameter of a nickel so not much room to maneuver. It does look pretty rough inside, which surprises me. I had expected it to be smooth. i don't have any idea what could have caused this. Maybe the previous owner used the wrong fluid or something. Anyway, it's always worked fine and I've never had any issues with leaking.
 
Top