

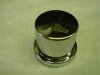
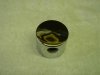
Chrome neutral switch cover
Ok here is what you need.
A nice shiny chrome abs 7/8” wheel lug cover.
I do not have a part number but something similar should be to be found at a wheel shop.
I found these had to buy a pack of 10
fig.1
You will also need new aveco connectors, 3M shrink wrap and some 3M strip caulk.
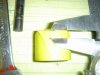
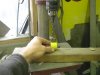
First mask up lug cover to cut of lip on ban saw.
fig.2
Smooth out bottom on belt sander
fig.3
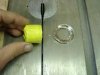
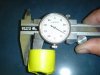
Measure the thickness of the cover you found. Mine is 1.35
fig.4
Add 3.75” for 3/8” hole= 5.10”
Divide by 2=2.55 and mark for hole placement.
fig.5
Drill in drill press with 3/8” bit
fig.6
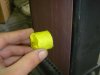
Ta da the modification is done.
fig.7
Now on to the install part.
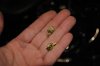
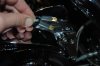
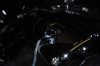
1 Cut off big ugly original connector and strip wire ends about 1/4"
fig.8
2 Grab new connectors
fig.9
3 Crimp- You can solder if you feel it is necessary. I did not.
fig.10
4 Slide on heat shrink.
fig.11
5 Heat with lighter or heat gun.
fig.12
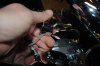
6 Slide wires through chrome cover hole as shown.
fig.13
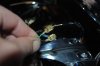
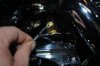
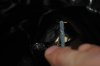
7 Slide connectors onto switch.
fig.14
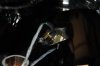
8 Get out strip caulk and apply around connectors and nut portion of switch.
fig.15
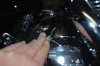
9 Press cover on and test indicator light.
fig.16
That’s it! All done.
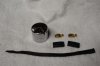
For those of you who don’t want to search for these parts I can provide everything pictured below with the cover already modified to fit for $19 shipped in the USA
I can ship elsewhere but members will have to pay the difference in shipping.
fig.17
Just so you understand I am doing this to help any members here out that may have looked for something similar as I did and came up empty handed.
At $19 shipped for the supplies, my time and shipping I assure you this is not a source of revenue idea. Just want to give back to the forum that has helped me.
I only have 9 at the moment but if the demand is there I can go get some more to make.
Ok here is what you need.
A nice shiny chrome abs 7/8” wheel lug cover.
I do not have a part number but something similar should be to be found at a wheel shop.
I found these had to buy a pack of 10
fig.1
You will also need new aveco connectors, 3M shrink wrap and some 3M strip caulk.
First mask up lug cover to cut of lip on ban saw.
fig.2
Smooth out bottom on belt sander
fig.3
Measure the thickness of the cover you found. Mine is 1.35
fig.4
Add 3.75” for 3/8” hole= 5.10”
Divide by 2=2.55 and mark for hole placement.
fig.5
Drill in drill press with 3/8” bit
fig.6
Ta da the modification is done.
fig.7
Now on to the install part.
1 Cut off big ugly original connector and strip wire ends about 1/4"
fig.8
2 Grab new connectors
fig.9
3 Crimp- You can solder if you feel it is necessary. I did not.
fig.10
4 Slide on heat shrink.
fig.11
5 Heat with lighter or heat gun.
fig.12
6 Slide wires through chrome cover hole as shown.
fig.13
7 Slide connectors onto switch.
fig.14
8 Get out strip caulk and apply around connectors and nut portion of switch.
fig.15
9 Press cover on and test indicator light.
fig.16
That’s it! All done.
For those of you who don’t want to search for these parts I can provide everything pictured below with the cover already modified to fit for $19 shipped in the USA
I can ship elsewhere but members will have to pay the difference in shipping.
fig.17
Just so you understand I am doing this to help any members here out that may have looked for something similar as I did and came up empty handed.
At $19 shipped for the supplies, my time and shipping I assure you this is not a source of revenue idea. Just want to give back to the forum that has helped me.
I only have 9 at the moment but if the demand is there I can go get some more to make.
Attachments
-
 64.7 KB Views: 297
 -
 92.9 KB Views: 264
 -
 70.6 KB Views: 252
 -
 94.7 KB Views: 254
 -
 86.2 KB Views: 254

")