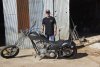
This was a complete ground-up build, took a while just working on the weekends on it.
ProjectX

 www.bigdogpartskingpin.com
I was going to do this whole big write-up and I spent a few hours on it and it's not done. But I don’t think anyone will read it so I just scraped it for now. Maybe I’ll post it later.
Figured I would get out a post for the folks who didn't get a chance to see it @ MastiffDaves back in Sept.
Part of my idea on this build ended up with an effort to make some parts available to others to modify their 06-11 K9 or Ridgeback fairly easily. Obviously as time/money permits you can put anything you dream together. The original Big Dog’s are a great platform, and as they get up in age, change hands, and get beat on parts need to be replaced and bikes need to get fixed. I believe strongly that something assembled by your own two hands will bring you tremendous more enjoyment in your own garage than buying something. Anyone can do it, if anyone knows my background I am not a mechanic. I just had a passion for working on my bikes and it steamrolled. Just takes time, research, drive, determination & a little common sense! And there's folks out there that would argue about my common sense, and I wouldn't disagree. Not sure how much of that I have either.
I wanted to keep it clean, the lines on the 08-11 Pitbull tank are a dead match fit for the frame in my opinion. HDM is currently finishing up the mounting kit to allow anyone with a 06-11K9 or Ridgeback bolt this style tank on. Give people a little chance to do a makeover. 08-11 Pitbull tank is also 4.7 gallons so it's 1/2 gallon bigger than the K9 or Ridgeback tanks. I have put exactly 4.0 gallons in the tank twice at fuel ups and haven't hit reserve yet. I did hit the reserve when I was doing some testing and I drained it to see what I was working with and it was about 1/2 gallon of reserve.
I stuck with black cables and black braided oil lines & did all the electrical wiring myself so it's all in black braided cabling to blend in. The stainless braided would stick out like a sore thumb in my opinion. Narrow 2" open belt drive, narrow front end, keeping it clean and tight. Kind of a little old school/new school mashup with a narrower front end and a 300 tire.
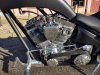
The 140” will fit a K9/Ridgeback frame but with a little caution, rocker box gaskets can’t be changed without taking the motor out of the frame. It’s a tight FIT! You can't even get a finger between the frame and the cover it's about 1/8". Also, coil cover and air cleaner will need to be changed out as the heads are so tall the bolt holes on the original units won’t fit. This coil cover mount is actually an older model coil cover but it is made out of billet and after elongating the holes it would fit.
I’ll let you all know how the 140” high compression motor (10.8:1) holds up, bikes first trip was 1,000 miles to Arkansas and back. I managed to sneak in 250 miles first before taking off, so I finished breaking in the motor on the way there. It's rated for more HP (160) & Torque (170) than I'll probably ever use. It has not once gave me any signs that it wasn't asking for more throttle.
The Texas hand made Three Two Choppers custom springer is perfect! Handles like a dream, feels lighter, tighter in the slow turns (gas pumps) & steady as a rock at 90+ MPH. Rake & Trail was changed just a touch, which makes the slow turning easier. Ride height stayed the same and the bike is about 1.5" overall longer in length. Has Ohlins bushings, which are oil impregnated so there is zero maintenance required, no grease can be used it screws up the bushings.
It's still a little work in progress have a few things to finish up this winter, I am working on a front fender setup to use for long trips. I don't think springers should have fenders so this one will be as small as I possibly can make and easy on/off. Just to keep me or the bike from getting rooster tailed if I get caught in the rain, which you are almost guaranteed to do when you do long trips.


Cheers!
ProjectX
Project X Build Frame Up
I wanted to keep it clean, the lines on the 08-11 Pitbull tank are a dead match fit for the frame in my opinion. HDM is currently finishing up the mounting kit to allow anyone with a 06-11K9 or Ridgeback bolt this style tank on. Give people a little chance to do a makeover. 08-11 Pitbull...
www.bigdogpartskingpin.com
I was going to do this whole big write-up and I spent a few hours on it and it's not done. But I don’t think anyone will read it so I just scraped it for now. Maybe I’ll post it later.
Figured I would get out a post for the folks who didn't get a chance to see it @ MastiffDaves back in Sept.
Part of my idea on this build ended up with an effort to make some parts available to others to modify their 06-11 K9 or Ridgeback fairly easily. Obviously as time/money permits you can put anything you dream together. The original Big Dog’s are a great platform, and as they get up in age, change hands, and get beat on parts need to be replaced and bikes need to get fixed. I believe strongly that something assembled by your own two hands will bring you tremendous more enjoyment in your own garage than buying something. Anyone can do it, if anyone knows my background I am not a mechanic. I just had a passion for working on my bikes and it steamrolled. Just takes time, research, drive, determination & a little common sense! And there's folks out there that would argue about my common sense, and I wouldn't disagree. Not sure how much of that I have either.
I wanted to keep it clean, the lines on the 08-11 Pitbull tank are a dead match fit for the frame in my opinion. HDM is currently finishing up the mounting kit to allow anyone with a 06-11K9 or Ridgeback bolt this style tank on. Give people a little chance to do a makeover. 08-11 Pitbull tank is also 4.7 gallons so it's 1/2 gallon bigger than the K9 or Ridgeback tanks. I have put exactly 4.0 gallons in the tank twice at fuel ups and haven't hit reserve yet. I did hit the reserve when I was doing some testing and I drained it to see what I was working with and it was about 1/2 gallon of reserve.
I stuck with black cables and black braided oil lines & did all the electrical wiring myself so it's all in black braided cabling to blend in. The stainless braided would stick out like a sore thumb in my opinion. Narrow 2" open belt drive, narrow front end, keeping it clean and tight. Kind of a little old school/new school mashup with a narrower front end and a 300 tire.
The 140” will fit a K9/Ridgeback frame but with a little caution, rocker box gaskets can’t be changed without taking the motor out of the frame. It’s a tight FIT! You can't even get a finger between the frame and the cover it's about 1/8". Also, coil cover and air cleaner will need to be changed out as the heads are so tall the bolt holes on the original units won’t fit. This coil cover mount is actually an older model coil cover but it is made out of billet and after elongating the holes it would fit.
I’ll let you all know how the 140” high compression motor (10.8:1) holds up, bikes first trip was 1,000 miles to Arkansas and back. I managed to sneak in 250 miles first before taking off, so I finished breaking in the motor on the way there. It's rated for more HP (160) & Torque (170) than I'll probably ever use. It has not once gave me any signs that it wasn't asking for more throttle.
The Texas hand made Three Two Choppers custom springer is perfect! Handles like a dream, feels lighter, tighter in the slow turns (gas pumps) & steady as a rock at 90+ MPH. Rake & Trail was changed just a touch, which makes the slow turning easier. Ride height stayed the same and the bike is about 1.5" overall longer in length. Has Ohlins bushings, which are oil impregnated so there is zero maintenance required, no grease can be used it screws up the bushings.
It's still a little work in progress have a few things to finish up this winter, I am working on a front fender setup to use for long trips. I don't think springers should have fenders so this one will be as small as I possibly can make and easy on/off. Just to keep me or the bike from getting rooster tailed if I get caught in the rain, which you are almost guaranteed to do when you do long trips.
- Frame: K9 Frame
- Gas Tank: 08-11 Pitbull (Gas tank conversion kit coming soon from HDM)
- Engine: Ultima 140” (170 Ft/lbs Torque/160 HP)
- Transmission: Ultima RSD 6 Speed
- Belt Drive: Ultima 2”
- Front end: Three Two Choppers Wishbone Springer (www.threetwochoppers.com)
- Wheels & Rotors: HDM
- Handlebars: HDM
- Hand Grips/Pegs - Banded Style
- Mirrors - HDM Old Skool
- Seat: Original K9 Seat modified to fit gas tank
- Wiring - M-unit
- Exhaust - FSD (I am probably going with a different exhaust if I can make something else fit, my first two I tried didn't fit as the 140" heads are too wide)
Cheers!
Attachments
-
 247.2 KB Views: 23
Last edited: