New Rubber for worn out Pegs, How-to!

Twisted

Well-Known Member
Ok, I posted my "Redoing Stock Pegs with Worn out Rubber" thread in the General section and got some good feedback so I figured I'd post a how to write-up to show anyone interested how you can make use out of your stock pegs that have beat up rubber. And best part of all, its CHEAP!!!

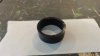
So after much searching for the right size rubber band type foot peg rubber and coming up with nothing, I came up with the idea of looking into cutting up a plumbing Fernco fitting into rings. Heres how to do it...


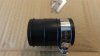
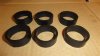
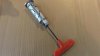
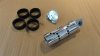
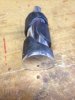
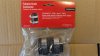
First you need to find the right size connector, I found these at Lowe's and they are for a 1.25-1.5" pipe and fit the pegs perfectly, just make sure they don't have any embossed wording, these are plain, some may not be and would look like crap, these were under $4 each and you can get 3 bands from each...


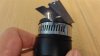
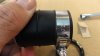
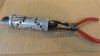
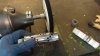
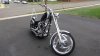
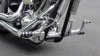
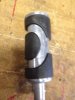
So all you need is connector like this and a used peg, when I bought my bike the passenger pegs looked like this, if yours still have rubber you will have to pull, tear, or cut it off...


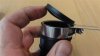
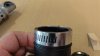
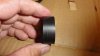
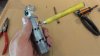
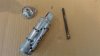
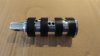
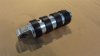
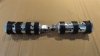
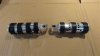
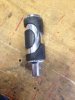
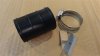
Here it is without the band clamps,you will use one band clamp and make sure you have some new razor blades...
 

Attachments

Last edited:

Twisted

Well-Known Member
Ok time to start cutting up some bands. First, put one of the supplied band clamps on the connector right against the raised lip and tighten the band clamp making sure it stays good and straight...


Next take out your new razor blade and slice into the rubber using the band clamp as your guide making sure to keep the razor as straight as possible...


Now running the razor against the edge of the band clamp, cut all the way around until you hit the band clamp adjuster section and stop...


Now loosen the band clamp, spin it 180 degrees and retighten, making sure that it is still against the raised lip and the areas already cut are even with the edge of the band clamp. Then finish cutting the last section...
 

Attachments

Last edited:

Twisted

Well-Known Member
Now that the end is cut off, loosen the band clamp again and slide it down till it hits the second raised lip and tighten down the band clamp, checking that it is nice and tight to the raised lip all the way around...


Now just repeat the cutting process just like the last cut. After your finished you should have one band for your peg...


Repeat these steps, for as many rings as you need to cut for your desired setup. One connector will get you 3 bands. I tried 3 and 4 bands and liked the look of 4 personally, here is 2 connectors worth of bands, 6 bands...


Now chances are, the bands are not going to be perfect, if you take your time they will come out straight but there will be imperfections. So I took a piece of 320 grit adhesive backed sand paper and stuck it to my workbench and just worked the bands back and forth over the sandpaper to smooth them out...


Attachments

Last edited:

Twisted

Well-Known Member
Now that you have all your bands cut up and ready to go, its time to get the pegs ready. First start by disassembling your peg using an allen wrench inserted into the end of the peg.


This unscrews a long bolt that goes into the end cap, once out it can all be disassembled. Make sure you don't loose the small locator pin that is in the cap end, it lines up the cap...


Next, take a small punch and poke all the rubber into the holes on the peg...


Then you can take some needle nose pliers and pull all that rubber out...


Attachments

Last edited:

Twisted

Well-Known Member
Now that you have a bare peg its time to do some cleaning and polishing...


Once your happy with the way your peg looks, you can start sliding the bands on the peg and get them where you want them...


Then reassemble the peg and your done!!!!!


I put these on my bike and so far so good although its been less than a week and only 100 miles or so so I'll have to see how durable they are in the long run. But they seem to be comfortable, don't feel like my feet are gonna fly off, and the bands are tight enough that they stay put and don't move around. Still looking for a 1" band that will fit the toe shifter/brake pegs so I have a matching set, so that's next.

Hope this helps anyone with worn pegs that doesn't want to spend a fortune on a new set. Feel free to comment with other ideas or better ways to do any of this.

Twisted
 

Attachments

Last edited:

Twisted

Well-Known Member
They look good:2thumbs: what did you use for adhesive.
Thanks guys :up: , no adhesive was used, the bands fit tight enough that they don't move around once put in place, although I have only put on 100 miles or so on the new setup so time will tell.
 

kickstart

Well-Known Member
Nice and thanks for sharing.

I have one thought for your cutting operation that may help to keep the cut straight and that is slip the rubber over a piece of pipe and then clamp it, that should keep the rubber from collapsing/moving as you cut it.
 

Twisted

Well-Known Member
Nice and thanks for sharing.

I have one thought for your cutting operation that may help to keep the cut straight and that is slip the rubber over a piece of pipe and then clamp it, that should keep the rubber from collapsing/moving as you cut it.
Good idea :cheers: !! Maybe a wooden dowel might be betterso it doesn't dull up the razor. Gonna try it when I do the other set.
 

SES

Member
Hey thanks for the write up . I have an old set of pegs and been thinking of how to make them usable. I,m really glad I found this thread today and that you had taken the time to post it. This is really a good ideal. Thanks again :2thumbs: Stan
 
Top