Mystery lead

Energy One

Paul.uk

Member
Hi again. I'm trying to get the rear lights working and the brake switches/lights on my 2016 mastiff/Coyote prototype. I've put up some pictures of a black wire with a 15a fuse in line that I'm not 100% to which terminal it should attach to. At the moment I've put it in the negative. One of the leads from this goes to earth on the frame, but I'm pretty sure it was originally fixed to the positive terminal, but not 100%. Does anyone know what this cable could be for and which terminal it should be on please? I have an idea it's related to the starting system but am not sure. Many thanks
 

Attachments

Sven

Well-Known Member
Usually a wire with a fuse inline calls for the (+) of the battery. Ground wires do not use a fuse. Posi side are the common side wires w/fuses.
Wire color spark to battery ground or posi side:
1. Orange flash and it's light action in arc. Usually the bike's dash/head/taillights may flicker.
2. Blue in color, heavy arc and spark. This is a tap of the wire on the posi side say is the fused wire so this has to touch the (+) side of the battery post. This is a direct short.
3. White in color and is heavy in the spark action, where the lead posts on the battery melts to the touch. This too is a direct short.

So the trick is to touch the battery post as fast as you can so as not to blow the fuse. This is more how you troubleshoot for a short. By removing wires or switch connectors, you found the shorted wire as you keep pulling one wire off the jobber, i.e., bulb, switch connector, running light, etc., and then test to see if this eliminated the the blue/white spark. All that is left is the orange spark, or no spark at all is the found short.
 

Paul.uk

Member
Usually a wire with a fuse inline calls for the (+) of the battery. Ground wires do not use a fuse. Posi side are the common side wires w/fuses.
Wire color spark to battery ground or posi side:
1. Orange flash and it's light action in arc. Usually the bike's dash/head/taillights may flicker.
2. Blue in color, heavy arc and spark. This is a tap of the wire on the posi side say is the fused wire so this has to touch the (+) side of the battery post. This is a direct short.
3. White in color and is heavy in the spark action, where the lead posts on the battery melts to the touch. This too is a direct short.

So the trick is to touch the battery post as fast as you can so as not to blow the fuse. This is more how you troubleshoot for a short. By removing wires or switch connectors, you found the shorted wire as you keep pulling one wire off the jobber, i.e., bulb, switch connector, running light, etc., and then test to see if this eliminated the the blue/white spark. All that is left is the orange spark, or no spark at all is the found short.
Thanks again Sven. Your a fountain of knowledge I'll try that. I'm pretty sure it was originally on the positive terminal but with the problems I've had with the main fuse not being big enough and then sourcing a powerful enough battery etc, it's been a while since I originally disconnected the battery that came with the bike.
 

Paul.uk

Member
Hi again I'm slowly going through the wiring to find out why the brake lights are not working I've also found that the number plate lights not working either.
I've come across this brown wire which is just hanging and I'm sure it should be attached to something but as the bikes a prototype I can't get a wiring diagram.
 

Attachments

Mikeinjersey

Well-Known Member
Hi again I'm slowly going through the wiring to find out why the brake lights are not working I've also found that the number plate lights not working either.
I've come across this brown wire which is just hanging and I'm sure it should be attached to something but as the bikes a prototype I can't get a wiring diagram.
Look for telltale solder on that wire. It may have been a part of that solder connection just below it. Crimps are preferred because solder ( especially a poor joint) likes to crack under vibration stress. https://www.hpacademy.com/technical-articles/solder-vs-crimping/
 

Sven

Well-Known Member
With a test light... this style:


Ground alligator clip, ice pick the copper strands in the brown wire, have key on. This shows you if it's hot. Then with key off, use an ohm meter, and remove the bulbs from their sockets. What light is not working, you ohm the brown wire strands with the one probe, then touch the bulb contacts in the light sockets... where you set the dial to infinity, touch meter probes together... that shows a complete loop from wire to bulb. Basically that's how you somewhat eliminate that wire, or is the wire for a bulb at said socket.
 

Paul.uk

Member
Look for telltale solder on that wire. It may have been a part of that solder connection just below it. Crimps are preferred because solder ( especially a poor joint) likes to crack under vibration stress. https://www.hpacademy.com/technical-articles/solder-vs-crimping/
Thanks, unfortunately it just ends there no sign of solder.
It's quite awkward to get at the wiring as I'm working literally in the street outside my house (when it's not raining) so can't take rear wheel out.
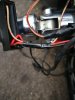
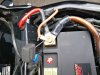
I've loosened the metal plate at the bottom of the rear mudguard but can't remove it as there's some electrical box attached. So I'm trying to find the problem visually by moving wire by wire to see if I can find the problem.
The wiring to the rear lights and indicators and even the number plate light work when tried on a separate battery so I know they are ok as far as continuity goes. And the rear indicators/tail lights will work when wired up to the bik, but not the brake lights and now I've noticed the number plate light isn't working either.
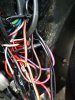
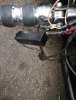
I've checked the rear brake wires near the brake, with a multi meter and it works so the problem is in this tangle of wires I think.
I dont know how to test the from brake switch but if I can get one working brake switch right now that will do.
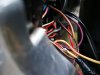
I'm pretty sure I hat he brown is a live feed but can't see anywhere it should go at the moment. Rain has stopped play for the day, but I'll be back at it as soon as I can.
I'm pretty sure the problem started after I went over a raised inspection cover in the road, a new one that has been put in recently. The the indicator/tail/brake had broken earth and the indicator won't work at all. I've got new ones to put on. Just need to find thefault while I can move all the wiring freely.
Thanks for the advic on crimp vs solder it'll come in useful.
 

Paul.uk

Member
With a test light... this style:


Ground alligator clip, ice pick the copper strands in the brown wire, have key on. This shows you if it's hot. Then with key off, use an ohm meter, and remove the bulbs from their sockets. What light is not working, you ohm the brown wire strands with the one probe, then touch the bulb contacts in the light sockets... where you set the dial to infinity, touch meter probes together... that shows a complete loop from wire to bulb. Basically that's how you somewhat eliminate that wire, or is the wire for a bulb at said socket.
Thanks I'll have to see if I can get one of those.
 

Mikeinjersey

Well-Known Member
Hi again. I'm trying to get the rear lights working and the brake switches/lights on my 2016 mastiff/Coyote prototype. I've put up some pictures of a black wire with a 15a fuse in line that I'm not 100% to which terminal it should attach to. At the moment I've put it in the negative. One of the leads from this goes to earth on the frame, but I'm pretty sure it was originally fixed to the positive terminal, but not 100%. Does anyone know what this cable could be for and which terminal it should be on please? I have an idea it's related to the starting system but am not sure. Many thanks
Since your wiring is such a mess you are going to need a lot of patience and troubleshoot each problem separately. Your street work environment doesn't help. The wire you speak of with the 15 amp fuse would go to the positive side. Fuses are to protect electrical parts from the Power if the wire happens to short out. You believe it may have something to do with the starter. Not likely. The starter is basically a dead short through the solenoid to operate and has no Circuit Breaker or fuse in the circuit. Does the bike have any add on accessories that may need a fuse. Disconnect it and see what doesn't work.
Does the EHC have fault lights on it? If so they help in locating shorts and opens.
Get the test light Sven suggested it's easier than reading a meter when your looking for power.
This wire diagram is from an 07 K9 . I don't know how different it will be from a 2016 Mastiff but it may help give you ideas of what to look for. Most (maybe all) circuits are controlled by the EHC . The EHC gets it power from the battery and distributes it to the needed part through signals it gets from the different switches like brake, tail light, headlight, hi beam, low beam, right blinker, left blinker ETC.


Paul.uk

Member
Thank you. I've just received one of those testers so will be having a look soon. As all the other lights work and everything but the brake lights work the wiring diagram will come in handy. As the brakes switches are linked together and at the moment neither are working I'm going to start there and at the same time try to work out why the number plate light isn't working I do think it's all related. Thanks for your help.
 

Mikeinjersey

Well-Known Member
Thank you. I've just received one of those testers so will be having a look soon. As all the other lights work and everything but the brake lights work the wiring diagram will come in handy. As the brakes switches are linked together and at the moment neither are working I'm going to start there and at the same time try to work out why the number plate light isn't working I do think it's all related. Thanks for your help.
Good Luck let us know how you make out. Don't forget to look at your EHC for fault lights if your model has them.
 

Sven

Well-Known Member
On the brown wire... ice pick into the wire, ground the alligator... then with key on, step on foot brake, turns, lever brake, high beam switching, anything that has a switch to send (+) to that brown wire. That eliminates all the switching loops.... and just tap the starter switch to see if the light comes on.

Again, you'd have to wire up the test light to a battery so when you remove the bulbs and touch the lamp buttons... ohm meter is easier for this test.
 

Paul.uk

Member
On the brown wire... ice pick into the wire, ground the alligator... then with key on, step on foot brake, turns, lever brake, high beam switching, anything that has a switch to send (+) to that brown wire. That eliminates all the switching loops.... and just tap the starter switch to see if the light comes on.

Again, you'd have to wire up the test light to a battery so when you remove the bulbs and touch the lamp buttons... ohm meter is easier for this test.
Thank you. Unfortunately rain has stopped me trying this today. Hoping the weather is gonna get better here soon so I can get on with it. According to most of the wiring diagrams I've seen the brown feeds the rh indicator but as my bike is a bit different this can't be the case as all the indicators will work now and rear tail lights, just not the brake lights or at the moment the number plate light. I'll get there in the end. Its annoying as the rest of the bike is sound and I want to get back riding it again. Luckily I have a few others to ride for the time being.
Thanks again everyone for your help.
 

Paul.uk

Member
On the brown wire... ice pick into the wire, ground the alligator... then with key on, step on foot brake, turns, lever brake, high beam switching, anything that has a switch to send (+) to that brown wire. That eliminates all the switching loops.... and just tap the starter switch to see if the light comes on.

Again, you'd have to wire up the test light to a battery so when you remove the bulbs and touch the lamp buttons... ohm meter is easier for this test.
Hi the brown wire isn't live after all and there's a pink and a blue wire next to it which don't seem to do anything either. I've got the number plate light, tail lights, both rear indicators. Ohm tested the brake switches and they seem to be fine. Given up for today can only take so much frustration in one go..
 

Sven

Well-Known Member
Always walk away... You get a fresh perspective if not, something clicks in the head and the hindsight is found. This is going to be more of brake cleaning the wires under the fender, or out from the fender is match colors or connection color changes. Meaning, yes, you might want to check every connected railroad track on its own. That says, I follow the socket to the end of the wire it is connected to. I disconnect the track, ohm the bulb nipple in the socket to the end of the connector you disconnected and ohm that length of wire for a break someplace? All ohms from one end to the other, you start at the connector wire pin and move to the next length of that color and it ends at?

So between the taillight bulb housing, you checked; running light to connector pin. Brake light nipple to end of connector pin. Ground wire from bulb housing to end of connector pin. Bulb socket is good, 3 wires out from the bulb socket has no break in any wire to socket housing. You just ruled out the bulb/harness assembly.

Think like that is one jobber's wire loop at a time. So the next wire from the brake light wire is; wire in connector down to the brake switch at the foot peg. Does that wire ohm or is there a break from one end to the other? It's a process of elimination.
 

Paul.uk

Member
Always walk away... You get a fresh perspective if not, something clicks in the head and the hindsight is found. This is going to be more of brake cleaning the wires under the fender, or out from the fender is match colors or connection color changes. Meaning, yes, you might want to check every connected railroad track on its own. That says, I follow the socket to the end of the wire it is connected to. I disconnect the track, ohm the bulb nipple in the socket to the end of the connector you disconnected and ohm that length of wire for a break someplace? All ohms from one end to the other, you start at the connector wire pin and move to the next length of that color and it ends at?

So between the taillight bulb housing, you checked; running light to connector pin. Brake light nipple to end of connector pin. Ground wire from bulb housing to end of connector pin. Bulb socket is good, 3 wires out from the bulb socket has no break in any wire to socket housing. You just ruled out the bulb/harness assembly.

Think like that is one jobber's wire loop at a time. So the next wire from the brake light wire is; wire in connector down to the brake switch at the foot peg. Does that wire ohm or is there a break from one end to the other? It's a process of elimination.
Thanks. All the wires under fender are complete and work if i put seperate battery on so I know theres no break in the wires there. brake switches both work using the ohms test. No visible obvious breaks so far when ive stripped back the tape anywhere. Do the brake lights send a signal to the ecu, then the ecu sends signal to the lights? although cant get to it really without removing oil tank and thats just too much for me to do on the street. ive found some more wires that are not live and dont seem to go anywhere, maybe for a sidestand switch ? also theres a black connector which was sealed in heatshrink and im not sure what it is. see photos. I will find the problem and I know when to walk away, but wiring is the one job I really dont like doing on bikes and with most of my other bikes being much older, I dont know what some of the bits are or do to be honest. I've never had a bike with crank sensors, and digital speedo etc. I really wouldn't want to ever look at some of the modern stuff with all the abs, anti wheelie, riding modes etc... I thnk its all dangerous anyway and it seems you need a computer degreee almost just to switch some of it on. Any way thanks i'll be back looking at it again tomorrow weather permitting.
 

Attachments

Last edited:

Paul.uk

Member
Also
Thanks. All the wires under fender are complete and work if i put seperate battery on so I know theres no break in the wires there. brake switches both work using the ohms test. No visible obvious breaks so far when ive stripped back the tape anywhere. Do the brake lights send a signal to the ecu, then the ecu sends signal to the lights? although cant get to it really without removing oil tank and thats just too much for me to do on the street. ive found some more wires that are not live and dont seem to go anywhere, maybe for a sidestand switch ? also theres a black connector which was sealed in heatshrink and im not sure what it is. see photos. I will find the problem and I know when to walk away, but wiring is the one job I really dont like doing on bikes and with most of my other bikes being much older, I dont know what some of the bits are or do to be honest. I've never had a bike with crank sensors, and digital speedo etc. I really wouldn't want to ever look at some of the modern stuff with all the abs, anti wheelie, riding modes etc... I thnk its all dangerous anyway and it seems you need a computer degreee almost just to switch some of it on. Any way thanks i'll be back looking at it again tomorrow weather permitting.
I've got those combination led rear lights which are indicators, tail and brake all in one. The indicators work and the tail lights work so it has to be in the brake light circuit somewhere.. Just where is the question.
 

Jersey Big Mike

100K mile club
so if the combo lights work as tail lights that's one filament.
if the turn signal works that's the "brighter" filament which is used to turn signal and brake.
If it works as a TS and not as brake I would check the brake switches and trace them.
easiest on is usually the back one which is frequently a banjo bolt switch.

Here's the logic break down. No signal goes from Light to EHC (other then load is monitored on headlight and switches to HB when LB is out)

Brake switches -> EHC -> brake/turn filament (both)
turn sig switch (left) -> ehc (timed run) -> turn sig filament (left)
turn sig switch (right) -> ehc (timed run) -> turn sig filament (right)
EHC -> tail light if key on.

It is within the realm of possibilities that the EHC has failed, however this is unlikely and its more likely wiring. Especially since that looks like its not perfectly stock. (extra connectors and tape etc).
 

Paul.uk

Member
Hi I'm not sure about the indicator led and the brake light led being the same one, but then I'm not sure about a few things but I'm trying to learn. The new rear combination lights I've got have a blue wire that connects the indicators and they are at the ends of the lights, there's a black earth wire that goes to earth, there's a white wire which is the live for the tail and then attached to that there's a red wire that should brighten the tail light to show I'm braking. All work off the bike on a battery. I do think your right about it being the brake circuit /switches. The problem started after I hit a raised inspection cover, pretty hard, to be honest I thought I was going to come off at one point it rocked the bike that much. When I lifted the fender to have a look the earth wire and the brake wire on the rh side light were both broken. Is it possible that the magnet in the front brake switch could have moved?
Thank you for your help I'll look again tomorrow if it's not raining.
 
Top