Mastiff gas tank question

Energy One

REMorris

OK Rider Shakey
I am in the late stage of installing a wire plus (thanks Jake) and I need some help.

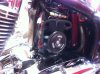
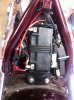
The tank is held in place with a rotatable plate. On the frame, there are 2 holes that this plate can mount to. The question is:

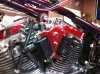
which hole does the center of this plate mount to? forward or backward hole. In the picture I have it in the forward hole. Unfortunately took off both bolts and didn't see how it was before.

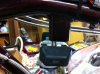
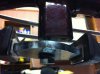
see pictures 1 and 2. pic 3 is of the dual coil setup I have had for a year or so.
 

Attachments

Call Jake he just did my mastiff but I was not there when he pulled the tank and put it back on, But trust me he just did it this last week end so he can get you going again
 

pknowles

RETIRED
It looks like you are missing a bolt. there are two bolts in this mount assembly. you are supposed to leave the fromt in loose, remove the rear completly and rotate the cam lock using a 3/8 inch short extension and ratchet. If you need pics and instructions, pm me with an e-mail.
 

08mastiff

Active Member
It looks like you are missing a bolt. there are two bolts in this mount assembly. you are supposed to leave the fromt in loose, remove the rear completly and rotate the cam lock using a 3/8 inch short extension and ratchet. If you need pics and instructions, pm me with an e-mail.
I agree.

The 08 manual states:

Remove the rearmost 3/8-16 hex cap screw and lock washers. Loosen the other 3/8-16 hex cap screw. Use a 3/8" ratchet and short extension to rotate the fuel tank mounting bracket until the front fuel tank mounts are removed from the tank indentions. Remove the fuel tank by sliding it rearward.

Good Luck.
 

bdmridgeback

Low Down Chop Shop
Hey REMorris....

Remember the part that I told you about NOT removing the forward bolt out of the center hole or it will all fall apart? :D:hi:

By your first two pics, it is together correct.


OK, the cam has three holes in it. The center pivot bolt that is not supposed to be removed goes in the center hole of the cam, and in the forward hole in the mount on the frame , just like you have it in the picture. After you set the tank on, and slide it forward, with the throttle cables on top of the cam, lock the tank in, using a ratchet and extension in the forward most hole. Put the rear bolt back in to lock it all up and tighten down both bolts.

Be sure to use blue loc-tite on the bolts. :2thumbs:
 

REMorris

OK Rider Shakey
Hey REMorris....

Remember the part that I told you about NOT removing the forward bolt out of the center hole or it will all fall apart? :D:hi:

By your first two pics, it is together correct.


OK, the cam has three holes in it. The center pivot bolt that is not supposed to be removed goes in the center hole of the cam, and in the forward hole in the mount on the frame , just like you have it in the picture. After you set the tank on, and slide it forward, with the throttle cables on top of the cam, lock the tank in, using a ratchet and extension in the forward most hole. Put the rear bolt back in to lock it all up and tighten down both bolts.

Be sure to use blue loc-tite on the bolts. :2thumbs:
Jake it was already apart when I talked to you (both bolts were out) and asked you what the trick was.
 

REMorris

OK Rider Shakey
I haven't finished the wire plus, still need to connect the 3 wires to the new switch and run the 2 big red wires to fuses and then to the battery. I stuffed all the new connectors and the 2 boards into the old ehc spot and I don't like the way it looks, so I will pull them back out and redo the final resting spot. I have the scorpio alarm that was over in that area and I still need to put it back there.

I don't guess you have any pictures of a Mastiff's ehc area after YOU finished a wire plus, do you?

If yes, can you post? or email me at richard.morris@cox.net

By the way, I am going to buy some of that silicone grease used in electrical connectors and put it in the 3 connectors AND smear some on the ends of the tank piece that rotates (on the rubber ends). Everyone agree this is ok on the wire-plus?

I would have finished it today, but we have major rain here. Something like 6-8" since last night.
 

BWG56

Guru
I'd put alittle lube on them rubbers to help with the locking and unlocking of them. White lithium
 

REMorris

OK Rider Shakey
Well, I have been outside finishing it up and did pretty well the opposite of what everyone said.

I did not put grease in the deusch connectors.
I put a light coating of the silicone dielectric greas on the tank crosspiece. It is a way to make turning it easier, and silicone grease will NOT attack rubber.

I got everything together and she fired right up.
I looked at the other thread that involved a wireplus in a Mastiff. Gee, my Mastiff sure looks different in the battery area. I was cramped for roon since I also had the scorpio alarm to hide.

Notice my battery sits 90 degrees different to the other Mastiff (mine is a 2009)
 

Attachments

pknowles

RETIRED
My battery in the 07 bulldog is set with the posts parallel to the frame. Opposite of the one that's in the pics.
 

bdmridgeback

Low Down Chop Shop
I haven't finished the wire plus, still need to connect the 3 wires to the new switch and run the 2 big red wires to fuses and then to the battery. I stuffed all the new connectors and the 2 boards into the old ehc spot and I don't like the way it looks, so I will pull them back out and redo the final resting spot. I have the scorpio alarm that was over in that area and I still need to put it back there.

I don't guess you have any pictures of a Mastiff's ehc area after YOU finished a wire plus, do you?

If yes, can you post? or email me at richard.morris@cox.net

By the way, I am going to buy some of that silicone grease used in electrical connectors and put it in the 3 connectors AND smear some on the ends of the tank piece that rotates (on the rubber ends). Everyone agree this is ok on the wire-plus?:confused::confused:


I would have finished it today, but we have major rain here. Something like 6-8" since last night.

You did state that you were puting the grease in the three plugs and on the cam of the tank... :D


I have always wondered.... WHY.... BDM pumped the EHC plugs full of dielectric grease... other than to keep water out...

Thought I'd copy this here...

"Dielectric grease is a nonconductive grease. Because it is nonconductive it does not enhance the flow of electrical current. Electrical conductors should not be coated with dielectric grease prior to being mated. However, dielectric grease is often applied to electrical connectors, particularly ones which contain rubber gaskets, as a way to provide a nonconductive lubricant and sealer for the rubber portions of the connector. The widest use of dielectric grease is in high-voltage connections associated with spark plugs. The grease is applied to the rubber boot of the plug wire. This helps the rubber boot slide onto the ceramic insulator of the plug. The grease also acts to seal the rubber boot, while at the same time preventing the rubber from becoming stuck to the ceramic. Generally spark plugs are located in areas of high temperature, and the grease is formulated to withstand the temperature range expected.

Another common use of dielectric grease is on the rubber mating surfaces or gaskets of multi-pin electrical connectors used in automotive and marine engines. The grease again acts as a lubricant and a sealant on the nonconductive mating surfaces of the connector. It is not recommended to be applied to the actual electrical conductive contacts of the connector because it could interfere with the electrical signals passing through the connector."
 
Last edited:

REMorris

OK Rider Shakey
I had intended to put dielectric grease in the 3 plugs. Laziness overwhelmed me or I would have.

The pins/sockets in the duesch connectors have a very good metal to metal mating. All the grease is doing is sealing off from water or air. Yes they have nice soft seals where a single wire goes through, but when you put 2 wires through that rubber seal, you just created an opening for water or humid air to get in.

I flip cars for a living and one of the things I come across is a problem when a car gets wet or it's really humid. Usually manifests itself as a mis-fire (code will say some cylinder is not firing or similar). In most cases this can be fixed by taking the connectors apart, swishing in isopropal alcohol and then blowing dry. (the IPA removes water in hidden spots). Then fill the connector with dielectric grease and you are fixed. I also put it on coil wires and spark plug ends both for lubrication as well as waterproofing.

I have never had any problem riding in the rain on the Mastiff and just want to keep it that way. The connectors that were on the EHC were covered in dielectric grease as well. I assume for the same reasons I did it.

While I had the tank off, I swapped out my polished aluminum speedo housing for a chrome one I had purchased a while back. On the tach ring (circuit board side) it was obvious that it had been in contact with water and was showing corrosion. After I had the tach ring and speedo installed in the new housing, I liberally applied dielectric grease to cover the tach ring circuit board. Time will tell if this was a good or bad move. But it will keep water off the board. I also left the rubber gasket seal off the chrome housing so it can drain better.
 
Last edited:

pknowles

RETIRED
In the install kit that i received, there was some short colored wire, to elimate the two into one hole problem. Did you use the printed instructions or Jakes how to on here?
 

REMorris

OK Rider Shakey
I had Kinko's print out the wiring diagram and instructions that Jake sent me in the mail as well as the instructions included in the box. (I only have a black and white laser printer). Cost nearly $50 for the printouts.

I don't recall either saying anything about using short wire (I was wondering why I had those left over).

If you have done one of these before, then I see how much easier it would be, but I had no help, was doing it on a late Saturday and Sunday. My Mastiff looks nothing like the pictures, I had never used deusch connectors before. It worked with zero problems once I got done. I did call Jake at one point as I had put wires in the connectors wrong. But I left him a message. By the time I got a response, I had figured out my problem.

I think there could be some additions to the docs that would help, but since I am done, and happy, it's not in my future to update docs beyond what I suggested in this thread.
 
Top