Rear Drive Alignment
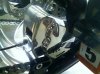
Once you have the engine and transmission installed, remove the primary plate to expose the transmission drive sprocket.
Check to make sure that the rear axle is square in the frame (front to back adjustment is the same on both sides usually is adequate). Sometimes this method does not assure that the rear wheel is perpendicular to the centerline of the frame. To further verify that the wheel is square, you can place two long straight edges on either side of the rear wheel, and use them to project forward to the front wheel, and measure the distance on either side from the straight edge to the wheel, making small adjustments to the rear axle adjuster blocks until both sides are the same.
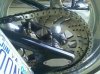
Now you have the engine and transmission aligned, the rear wheel centered and straight, and the rear drive can be aligned. Take a look from the rear of the motorcycle forward across the rear wheel hub to the transmission sprocket. Does the rear hub mounting flange extend out far enough for the chain width to clear the tire? If not, use spacer washers to move the drive sprocket away from the hub far enough to allow the chain to clear the tire by a safe margin (.150” Minimum).
Use a straight edge held to the outside face of the drive sprocket to project forward to the outside face of the transmission sprocket. If it lines up perfectly, YOU’RE DONE! (Relax, it never does……)
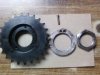
If the straight edge does not touch the outside edge of the transmission sprocket, determine the amount of adjustment needed to make the two faces line up. If it is less than .200”, you can adjust the alignment by eliminating some of the washer space under the rear sprocket (Yes, this moves the chain closer to the tire), and then make up the balance of the distance by moving the rear wheel off of the centerline to make the two match. Moving off the centerline is not ideal, but sometimes it has to be done to clear frame rails (or even to balance the bike).
If the straightedge goes past the outside edge of the transmission sprocket, add more washers under the rear sprocket to move it outward and line things up.
If the adjustment needed is greater than .200”, or you want to make it align perfectly on center, you will need to select another transmission sprocket with a greater (or smaller) offset dimension to get things to line up. In this case, you can remove the transmission sprocket, and measure from the inside edge of your straight edge to the outside face of the bearing spacer that is revealed when you remove the trans sprocket. Then give us a call, and we can help you find the closest stock offset available, or build you a custom sprocket to get your project to line up correctly. Sometimes it’s a matter of extending the rear sprocket further, and selecting a greater offset at the transmission to get things sorted out at the rear wheel. Sometimes the frame or swing arm can get in the way.
In the end, you must position the rear sprocket and transmission sprocket within .050” for proper chain operation, the closer to absolute, the better.
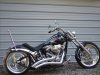
Any way you build it, there’s a way. Most frame manufacturers have already sorted out a drive solution for the frame they provide you, and some come with the necessary primary spacer kit and/or extended transmission shaft to get it done. We’re here to help.