blacktopper
Active Member
Like a lot of you who tour, I use the pillion pad and put a T-bag on it to use as a backrest. At 5' 6", the stock K9 handlebars had me too far forward to use the backrest. So I decided it was time to get handlebars that would move back a few inches so I could make good contact against the T-bag. Many on this Forum have used Ridgeback handlebars, so I tried to find some, and discovered they are indeed scarce.
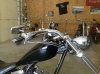
So I called Derek (Shovelheadkicker) to see what he had. No Ridgeback bars there either, but he suggested that maybe a set of bars from a 2008 Pitbull might fit the bill. We weren't sure about cables, etc., and Derek was incredibly helpful in helping me decide how to go at this. He actually mocked up three different sets of bars on a rolling chassis and sent photos of each so I could see the differences. We finally decided to go with the 2008 Pitbull bars. I talked with Derek on Tuesday afternoon and early Wednesday the parts arrived. In fact, Skogdog and I installed them, and I test rode the new handlebars Wednesday afternoon.
The Pitbull bars worked out perfectly, extending back exactly 3 1/4" further than the K9 bars. We stretched a piece of electrician's tape from handgrip to handgrip and measured from the fork back and the sissy bar forward. Both methods agree a bit over 3" setback.
For those of you who are interested in this conversion, just call Shovelheadkicker or Donna at 620-257-2009 and purchase the following:
2008 Pitbull handlebars
One 2008 Ridgeback brake line
One 2008 Ridgeback clutch cable
One 2008 Pitbull speedometer/Tach bracket
Two 2008 Pitbull wiring handlebar harnesses for the left and right
Basic Steps:
It is a LOT easier with two people, one for wrenching and the other for securing loosened parts.
Remove Carb Air cleaner
Drain and remove fuel tank
Remove brake line
Loosen clutch cable
Remove mirror on clutch side and punch out the bushing
Disassemble clutch handgrip (two small screws underneath-pull out retaining clip)
Locate and loosen the JST plugs coming from the hand controls and speedo/tach
Loosen hand controls on both sides (don't need to completely disassemble unless you service cables, etc.)
Look inside hand controls and disconnect the wiring plug (flat white plastic clip)
Remove handlebar bolts under top triple tree
When handlebars are loose, you can slide off the hand controls
Remove handlebars
Remove the tach/speedo unit from bars
Install wires in new handlebars. (Try using a wire to fish it thru)
Remove clutch pushrod cover (ball ramp)
Remove clutch cable housing. Turn it over and remove the ball ramp cover plate and remove clutch cable. (In removing the cable from the housing, it is easier to spin the housing than it is to turn the cable)
Considerations:
It is probably easier to remove/install the bars and tach/speedo as a unit.
This is an opportunity to lube cables, etc., as well as to apply dielectric grease to the JST connectors under the tank.
The flat white connectors in the hand control housings are a little hard to get at. If you have big hands try a needle nose to align..they click in when correctly installed.
It is best to have two to bleed the front brake unless you have equipment.
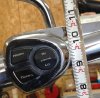
The K9 speedo/tach bracket will only leave a 1/16" or less clearance between the bracket and your fuel tank. The Pitbull bracket initially appears identical, but in fact has a slightly different angle to create adequate clearance. One might also install washers where the bars meet the triple tree to raise it a bit.
Depending on your exhaust configuration, it might be easier to remove the exhaust for clutch ball ramp housing removal.
You'll need basic tools, including a ft.lb. torque wrench. You'll need red (steel) and blue (aluminum) Loctite and dielectric grease.
I can't say enough about Derek/Donna's help in this modification. There were many variables to consider in adapting these handlebars and happily Derek had answers and gave very accurate technical advice. He is a great asset to this Forum.
So I called Derek (Shovelheadkicker) to see what he had. No Ridgeback bars there either, but he suggested that maybe a set of bars from a 2008 Pitbull might fit the bill. We weren't sure about cables, etc., and Derek was incredibly helpful in helping me decide how to go at this. He actually mocked up three different sets of bars on a rolling chassis and sent photos of each so I could see the differences. We finally decided to go with the 2008 Pitbull bars. I talked with Derek on Tuesday afternoon and early Wednesday the parts arrived. In fact, Skogdog and I installed them, and I test rode the new handlebars Wednesday afternoon.
The Pitbull bars worked out perfectly, extending back exactly 3 1/4" further than the K9 bars. We stretched a piece of electrician's tape from handgrip to handgrip and measured from the fork back and the sissy bar forward. Both methods agree a bit over 3" setback.
For those of you who are interested in this conversion, just call Shovelheadkicker or Donna at 620-257-2009 and purchase the following:
2008 Pitbull handlebars
One 2008 Ridgeback brake line
One 2008 Ridgeback clutch cable
One 2008 Pitbull speedometer/Tach bracket
Two 2008 Pitbull wiring handlebar harnesses for the left and right
Basic Steps:
It is a LOT easier with two people, one for wrenching and the other for securing loosened parts.
Remove Carb Air cleaner
Drain and remove fuel tank
Remove brake line
Loosen clutch cable
Remove mirror on clutch side and punch out the bushing
Disassemble clutch handgrip (two small screws underneath-pull out retaining clip)
Locate and loosen the JST plugs coming from the hand controls and speedo/tach
Loosen hand controls on both sides (don't need to completely disassemble unless you service cables, etc.)
Look inside hand controls and disconnect the wiring plug (flat white plastic clip)
Remove handlebar bolts under top triple tree
When handlebars are loose, you can slide off the hand controls
Remove handlebars
Remove the tach/speedo unit from bars
Install wires in new handlebars. (Try using a wire to fish it thru)
Remove clutch pushrod cover (ball ramp)
Remove clutch cable housing. Turn it over and remove the ball ramp cover plate and remove clutch cable. (In removing the cable from the housing, it is easier to spin the housing than it is to turn the cable)
Considerations:
It is probably easier to remove/install the bars and tach/speedo as a unit.
This is an opportunity to lube cables, etc., as well as to apply dielectric grease to the JST connectors under the tank.
The flat white connectors in the hand control housings are a little hard to get at. If you have big hands try a needle nose to align..they click in when correctly installed.
It is best to have two to bleed the front brake unless you have equipment.
The K9 speedo/tach bracket will only leave a 1/16" or less clearance between the bracket and your fuel tank. The Pitbull bracket initially appears identical, but in fact has a slightly different angle to create adequate clearance. One might also install washers where the bars meet the triple tree to raise it a bit.
Depending on your exhaust configuration, it might be easier to remove the exhaust for clutch ball ramp housing removal.
You'll need basic tools, including a ft.lb. torque wrench. You'll need red (steel) and blue (aluminum) Loctite and dielectric grease.
I can't say enough about Derek/Donna's help in this modification. There were many variables to consider in adapting these handlebars and happily Derek had answers and gave very accurate technical advice. He is a great asset to this Forum.
Attachments
-
 199.6 KB Views: 296

") !
!