BAKER SYNCHRONOUS BELT DRIVE

Analog

Member
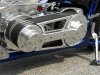
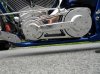
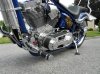
Ordered my Baker Belt Drive Yesterday and it’s on the way!! Will prep the K-9 this weekend for install, will be ready and waiting for goodie’s to arrive!! Will post pic’s and comments on installation when done! :cheers:

I would like to send out a Big Thank You to James Simonelli at Baker Drivetrain!! James was very professional, courteous, and helpful with my questions and purchase of Belt Drive!! :2thumbs:
 

Analog

Member
K-9 Prepped for Baker Belt Drive

Update on the Baker Synchronous Belt Drive installation! I have my K-9 prepped and ready for the Baker Belt Drive expect it to come in Monday. Baker’s installation instructions have been right to the point on all aspects so far in the removal of the factory Primary, no surprises during removal! I went a little further with the removal in order to gain access to Trans and engine for cleaning and polish.

Step’s so far:
*Fuel shut off
*Bike Washed before Surgery :lol:
*Removed Exhaust
*Disconnect and removed Battery
*Removed Side Covers
*Removed Battery Box, Side Cover Support and Electronics mounted to B. B.
*Removed Starter and Cables
*Drained Primary and Trans Fluids
*Removed Clutch adjust access cover, loosened clutch jam nut and pulled pushrod out
about an inch
*Accessed the Primary, removed Clutch, Motor Sprocket and Chain as complete
assembly
*Removed Inner Primary
*Tapped all mounting holes, Cleaned Threads Engine and Trans
*Cleaned all mounting area for new belt Drive Motor Plate
*Polished Engine, Trans and Frame

More to come!! :cheers:
DSCN5659.jpg

DSCN5660.jpg
 

V

Guru
Do you need to replace the crankshaft seal in the reverse position?

Very clean:2thumbs:
 

Analog

Member
Do you need to replace the crankshaft seal in the reverse position?

Very clean:2thumbs:
No, nothing mentioned in Bakers Install about replacing Crankshaft Seal. The engine case O Ring that sealed the factory primary is to be removed so that any water that may enter can drain out. (Baker Instructions)
 
Last edited:

Brew

Troop Supporter
No, nothing mentioned in Bakers Install about replacing Crankshaft Seal. The engine case O Ring that sealed the factory primary is to be removed so that any water that may enter can drain out. (Baker Instructions)
It does state in the S&S manual that the shaft seal is installed facing out for a wet primary. The motor manual suggest that if you're installing an open drive that the seal should be replaced and the oil seal should face the flywheel side, I changed mine out. Another thing I would do if I were you is pull your stator cover and wipe out any excess oil. Once you put your belt drive together you will see some oil leaking for a little while if you don't.
 

Analog

Member
It does state in the S&S manual that the shaft seal is installed facing out for a wet primary. The motor manual suggest that if you're installing an open drive that the seal should be replaced and the oil seal should face the flywheel side, I changed mine out. Another thing I would do if I were you is pull your stator cover and wipe out any excess oil. Once you put your belt drive together you will see some oil leaking for a little while if you don't.
Thank You, I will check on the seal and clean out behind stator cover! :up:
 

Staffy

Active Member
What V and Brew said.....

Clean behind the stator and get a new seal - flip it when installing (lip with spring towards the inside)

Recommended procedure and you will be glad you did so.
 

Analog

Member
MANY THANKS!!!!

Many, Many Thanks to the guys here on the Big Dog Forum!!! :2thumbs:

You were 100% correct about Crank Shaft Oil Seal! I checked in my S&S manual and sure enough in needs to be reversed with a new seal. If it weren’t for you guys I would have missed this and would have been an unhappy camper later on!! :angry:

Sent a message to Baker to have a note on this matter placed in there install instructions!

Oil seal removed and stator cleaned ready for reassembly with new oil seal!! Oil seal was a tricky little bugger getting out!!

Thanks Again Guys!!! :cheers:


DSCN5661.jpg
 
Last edited:

Analog

Member
So where are the pictures?? Figured you'd be done by now:D
Pops,

UPS guy was late getting to the house Monday, belt drive didnt arive until 6:00pm, started install and had drive 95% complete that evening. Didn't work on it at all Tuesday or Wednesday due to trouble with equipment at work, and the heat has just been a killer out there!!! So when I did get home, in the AC that is were I stayed!!

I did get the K-9 finished up this evening, in fact I just came in got a shower, ate a late supper and I'm checking my email. I want to give the bike a final cleaning and going over Friday when I get home from work, once that is complete I will get some pictures posted!!

Belt drive looks great and is very quiet, not much chatter at all, took her for a quick run around the block and all seems to be working fine!! Pictures will be on the way!!

Thanks for keeping posted!!! :cheers:
 

Pops

Active Member
Thanks for the update.....looking forward to the pictures :whoop:

I thought everyone kept their dogs in climate controlled garages :roll:
It was only 102 degrees here today :eek::eek:
 

Analog

Member
Thanks for the update.....looking forward to the pictures :whoop:

I thought everyone kept their dogs in climate controlled garages :roll:
It was only 102 degrees here today :eek::eek:

Well Pops, the garage temp was OK, I was the one that was beat from the heat! LOL! 102 degrees, WOW!! I think its just the fact it goes from low 70s into high 90s close to 100 and your body dosn't get a chance to adjust!

I will be buffing with one hand and tilting a cold one with the other this evening!! :whoop:

Later my Friend! :cheers:
 

05 old dog

Well-Known Member
how hard was it to pull and install a new crank seal...will the seal stay in...i didnt change mine out 2 months ago and have had no problems to date...but i am keeping a close eye on it...im wanting to see your pics also...
 

Analog

Member
how hard was it to pull and install a new crank seal...will the seal stay in...i didnt change mine out 2 months ago and have had no problems to date...but i am keeping a close eye on it...im wanting to see your pics also...


The seal removal was a little tricky. What I ended up doing after studying the engine exploded view in manual, was to VERY, VERY, CAREFULLY and VERY SLOWLY drill two small holes opposite of each other in the seal face, center between the rubber seal lip and the seal side wall. AS SOON AS THE BIT BREAKS THROUGH THE SEAL STOP!! If you drill in to hard and to fast you are going to be into your crank bearing or engine side wall. I started with the smallest bit I had in my drill index then stepped it up one size, needed a hole large enough to start a small sheet metal screw. After each hole was drilled the filings excreted from the bit were removed. After drilling holes I inserted long small sheet metal screws just far enough to get a bite on the seal face. Then use two small vise grips, one on each screw and tapped the seal out with small hammer, (tapping on the vise grips themselves), alternating between the two grips. Seal came right out with no trouble, cleaned engine case for new seal installation and made sure no filings were left behind. I had no filings at all in engine area all were out side of old seal when drilling. New seal was purchased at the local Harley Shop, normal item in stock, and was inserted in engine. Before new seal installation, packed the back of the seal, (spring side) with Vaseline peritoneum jelly, there have been cases where the seal spring will jump off while tapping seal into place, the Vaseline will keep spring from jumping off, also use a little to coat the lips on the seal. You don’t want to put a dry seal on the crank, when you start up the bike the crank may tear at the seal. The Vaseline will melt away when engine gets up to operating temp. I’m going to change my oil after I get a good run on the bike. I used an aluminum seal installer from Jessel, had from another belt drive install on a small block, I don’t know of any deep well sockets out there with enough clearance so my next step was to get a peace of schedule 40 conduit and make my own driver. This has been done before and works quite well.

I had already trashed my original pulled seal so the pictures are of a new one but you should be able to get the idea. If you have anymore questions?????

Hope this helps!!

Sorry my pictures are big when you open the thread, I can't seem to get that figured out! If you click on them they will open up!

:cheers:

DSCN5859.JPG
DSCN5861.JPG
DSCN5862.JPG
DSCN5863.JPG
 
Last edited:
Top