
2005 BIG DOG RIDGEBACK BRAKE PAD REPLACEMENT
- Thread starter Lifwghts
- Start date


BroadBand
Since late 60's
Motorcycle Brake Systems

The main two categories are drum brakes and disc brakes. Because the vast majority of brake systems today are disc brakes, that's what we'll be going over; but you'll still need to be able to tell the difference to make sure. In order to spot this type of brake, you'll be able to notice a "drum" mounted on the wheel of your motorcycle. If you can't seem to find this drum because it is either internal or combined with the rim of your bike, you'll just have to look for a brake disk. If there isn't one, your brake system operates off of a brake drum.
Disc brakes are a lot easier to work with as they are less likely to overheat and need less up-keep than drum brakes. You can easily spot these types of brakes by taking a gander at your wheel and spotting a metal disc mounted to the wheel, and a caliper attached to your forks or swingarm. Disc brakes can operate on both the front and rear wheels by using a system of pistons that are housed inside calipers which press the pads against the disc you spotted by your wheels. Many motorcycles have disc brakes on both the front and the rear, but some may only have them on the front wheel with drum brakes on the rear.
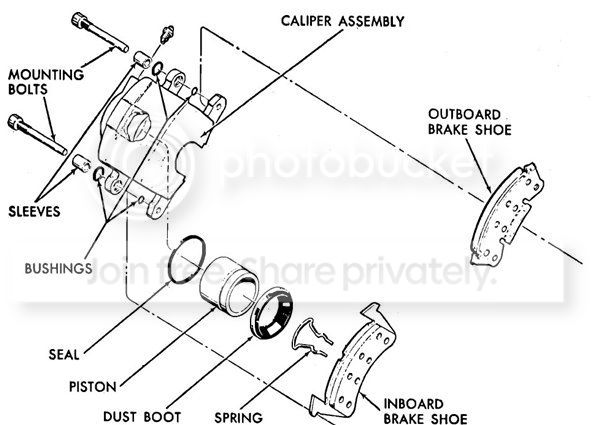
Because disc brakes are not protected by the drum, they're more subject to the elements. While this doesn't mean you can't ride in all conditions, it's always a good idea just to keep this is mind if you happen to get caught riding in the rain. And while disc brakes typically need less care, both drum and disc brakes require regular maintenance in order to work properly.
Brake System Maintenance
In order to keep your brakes from failing miserably right when you need them to work desperately, be sure to check them often. While you could have a mechanic check them every now and then, knowing what to look for yourself will help you make sure they're functioning properly, and learning how to service them yourself will save you a lot of money.
The first thing you will always want to do when checking your brakes is to check how thick the brake pads are. You don't want to wait until your brakes are gone and it's actually the metal backing of the pad and not the pad material that's slowing you down. If you let your brakes get that low, it'll damage your brake rotors and require you to change them out which will cost you precious ride time and a pretty penny. Instead, change your brake pads at the first sign that they're getting a little too low.
Changing your Motorcycle Brake Pads
You should check your owner's manual for specs on at what point brake pads should be changed (this is typically somewhere between 1-3mm.) Many brake pads will have vertical grooves in them to act as wear indicators that will show you when they need to be changed, Change out your brakes when one pad reaches the indicator even if the other isn't quite there yet. (Note: on some bikes you can slide the pad out to inspect it with the caliper still mounted. Check your owner's manual; if this is the case on your bike you can save yourself a lot of time.)

Locate the caliper that is attached to the rotor on your wheel. Before detaching the caliper, if there is a bolt holding the pads in place loosen it but don't remove it completely. Once it's loose, unscrew the bolts that are holding the caliper in place on the rotor and carefully slide it free. (Because the calipers are heavy, you don't want them to just dangle because they can easily scratch your rim; it's a good idea to tie it up with a zip tie to keep them under control.)
As the pads wear down, the pistons inside the caliper that push the pads onto the disc in order to stop your bike adjust slightly with them. Since there is less padding between the pistons and the disc, the pistons will have been pressed out of the caliper a little more than when the pads were first installed. Because of this, you'll need to push the pistons back into the caliper as much as possible in order to give the new pads enough room.
An easy way to do this is to insert a flathead screwdriver in between the pads before you remove them from the caliper and gently wiggle it so that the pads get pushed back further into the caliper and the pistons reset. Another way to do this is by using a C-clamp to push them back into place. You definitely want to avoid hitting the brake lever at all during this entire procedure as this will pop them back out!

Once the caliper is free from the disc and your pistons are pushed back, remove the pin that is holding the pads in place completely. Some of these pins will be held in place by tiny copper pins. If yours is, remove these pins with needle nose pliers first. Once the pin is out, there may be a retainer spring plate laying on top of the pads which will come right out and then allow you to slide out the brake pads. Some bikes will also have insulators or spacers that will go behind the brake pads in order to make the brakes quieter and reduce vibrations, so take note of them as well.
Now you can put the new brake pads into place, put the spring plate (if your bike had one in the first place) back over them and insert the pin back into the caliper. If you removed tiny copper pins, be sure to put them back in place as well. You may find it to be easier to apply a tad bit of grease to the pin before screwing it back in. Now that the caliper is all put back together, slide it back onto the rotor.
If it doesn't seem to fit back on the rotor, this is probably because you didn't push the pistons back far enough and you may have to remove the new pads in order to push the pistons far enough back into the caliper to allow enough room between the new pads for the rotor. After you get the caliper back in place, add some blue Loctite to the bolts that hold the caliper in place and reattach them to the rotor. Check your service manual as it may recommend tightening the bolts to a specific torque.
Right after you've finished the install, pump the brakes several times in order to make sure that they are back in their proper position. You'll then want to check the brake manufacturer for their recommended "bed in" procedure. It's important to bed in your brake pads to a clean rotor in order to prevent glazing and allow for the pads to mate properly with the rotor's surface. One standard way of doing this is to ride slowly at about 10-15 mph and do gradual and periodic stops. Increase the speed at which you stop at by 10 mph each time until you're going about 40-50 mph. Do this about two or three times to allow the brake pads to break in. After that, just remember to be particularly careful with your braking on your first ride out.
Brake bleed tools
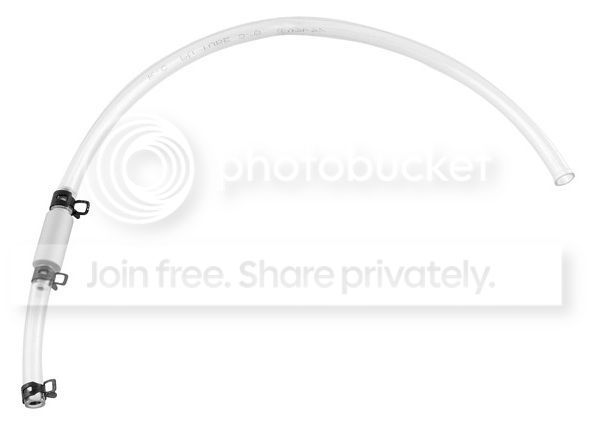
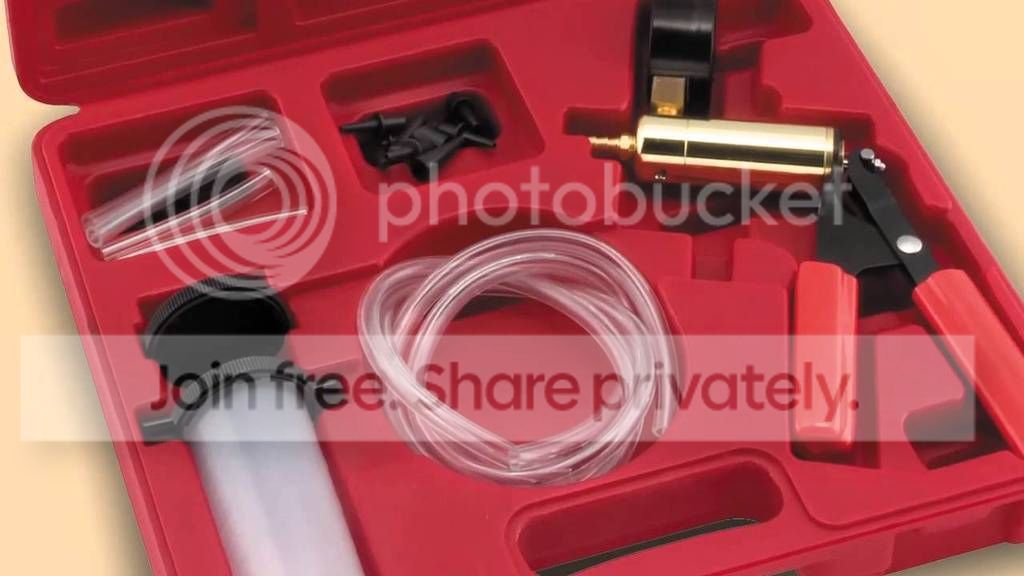
Bleeding Motorcycle Brakes
No matter how new your brake pads are, a huge part of disc brake maintenance is bleeding the fluid in your brake system. Bleeding your brakes can be a pretty simple job that should be done at least once a year no matter how often you ride. There are a few different techniques and tools when it comes to this, so read through them and look for one you're comfortable with.
The process of bleeding your brakes can vary depending on the type of bike you're working on. Different models will have different types of brake systems and you should check with your service manual if you are at all unsure about how to go about the process.
Some Notes on Brake Fluid Attention: Use DOT 5 brake fluid on our BDM cycles
Brake fluid degrades over time and will become dark even if you haven't ridden all year long. And since this fluid is hydrophilic, it sucks moisture out of the air which will cause the performance of your brakes to deteriorate and make you lose pressure.
Always use a new bottle of brake fluid. While you think you just opened this last bottle, if it's more than a month old, the fluid inside the bottle will have already "expired" because it has been absorbing moisture in air the entire time it's been sitting, which can damage your brake systems and force you to do unnecessary maintenance. While buying a new bottle may make you spend a few extra bucks, it'll save you a lot more down the road when you don't wreck your brake system.
You'll also want to make sure that you buy the correct rating of brake fluid. Brake fluid comes in varying DOT standards from 3 to 5.1 which denotes at what point the fluid boils at. It's important to stick with the brake fluid that is recommended in your service manual.
The Standard Method
Brake fluid is highly corrosive and pretty nasty stuff, so make sure you have all the tools you'll need for the process by you before you get started. It can really do a number on motorcycle paint and your skin, so have a catch can and plenty of rags handy, along with some nitrile gloves on.
Use shop towels to cover up any areas you're concerned about spilling brake fluid, attach the end of the brake bleeder to the brake fluid nipple on your caliper. The brake bleeder should have an arrow pointing to the end of the tube that should be attached to the caliper. If the tube that you bought for this doesn't come with a catch, attach some kind of catch can or a plastic bag to the other side of the brake bleeder. An easy way to make sure it's secure is simply with a little tape.
Now that you can feel confident that the old brake fluid will make its way out of the cable without getting everywhere, head up to the brake fluid reservoir and remove the screws holding the cover and diaphragm in place on top of the reservoir. Try to keep the diaphragm attached to the cover and set them aside. With the cover off, you'll be able to see the fluid inside the reservoir.
At this point, if you are doing this whole process without the help of a brake bleeder, or any other tool that has a valve that will help you keep any air from sneaking up into your caliper, you might need to borrow the help of a friend here. In order to allow the brake fluid out while also keeping air out, you'll need to open and close the bleeder screw as you pump the brake lever. (If you don't have a friend to help, don't worry because we'll cover some ways to do this solo in the next section.)
Place your helper down by the caliper with the wrench attached to the bleeder screw in hand. You will then pump the brake in order to build up pressure in the brake system which will push the fluid out. As you pull the brake lever in, have your helper crack open the bleeder screw and let the fluid flow. Once a bit of the fluid has made its way into your catch can via the tube, have your buddy close the bleeder screw BEFORE you release the lever; if you release the lever while the screw is still open, it will suck air into your brake system.
Repeat this process a handful of times while keeping an eye on the amount of fluid in your reservoir. Never let your reservoir run empty as this will only let in air. Top the reservoir off with fresh fluid as it gets low. The longer you do this, the clearer the fluid that is coming out of your bike should look. You want to repeat this process until you're confident all the old brake fluid has been flushed out and only fresh fluid remains in the caliper, lines, and reservoir.
Keep an eye out for any bubbles in the fluid as it's pushed through the tube as well. You'll want to tap the brake line a few times as it runs from the reservoir to the caliper to help free any air in the line. It's always important to make sure that the fluid in your line has no air left in it; because air compresses but brake fluid does not, if there is any air in your lines at all it will cause your brakes to feel mushy and they will not function properly. Once the fluid is clear and free of bubbles, close up the bleeder screw for good and remove the drain tube from the caliper.
Tip: if you feel like air bubbles have made their way into the system and you can't seem to flush them, you can zip-tie or bungee cord the brake lever pulled in to open up the brake system and let it sit overnight. The air will gradually make its way up to the top on its own. The next day, you should be good.
If your bike has two calipers, you'll need to bleed both individually in order to flush the old fluid out of the brake line and pistons of each. Just repeat the same process on the other caliper until the fluid flowing out of it is clear and bubble free as well.
Once the calipers have been bled, you'll want to make sure the reservoir is topped off with fluid and then put the diaphragm and cover back in place. Be sure not to over fill the reservoir with fluid as this will put too much pressure on your brake system as the fluid heats up. Pump the brakes a few times to return brake pressure before you start riding.
The Rear Brake
While the process of this will be pretty much the same as with front brakes, you'll be bleeding out a different reservoir and master cylinder. You'll need to locate this part in order to get started. As always, check your service manual so you know where all the rear brake components are. Once you've found the master cylinder, the bleeding process itself is essentially the same.
Other Options
Of course, we don't always have friends around to help us out with our moto maintenance and some of us prefer to do our jobs solo. So technology has helped parts manufacturers to come out with a few handy hand tools that can make bleeding your brakes a one man job and a whole lot easier.
The Speed Bleeder
Speed bleeders are what I use, and they are an awesome little tool that will cheaply help you bleed your brakes without needing a friend is a speed bleeder like this Goodridge Brake Speed Bleeder. These tiny little tools replace the bleeder screw on the caliper and stay on your bike 24/7. You'll never notice a difference until you go to do the painful task of bleeding your brakes. These guys also have a check valve inside of them that lets the fluid out without letting air in which eliminates the need for a second body to open and close the bleeder screw.
To use them, just attach a simple rubber tube with the catch can, open the speed bleeder by turning it a quarter-turn, and pump the brake lever. When your fluid has been completely flushed, just close up the speed bleeder, remove the tube, top off the reservoir, replace the reservoir cover and be on your merry way after pumping the brakes a few times to return pressure. Sizes will vary depending on the bike so check the size of your bleeder screw and buy the speed bleeder accordingly.
When installing a speed bleeder to your bike, it's always better to do it on a brake system that is already full of fluid. When installing them, a very small amount of the brake fluid will leak out because you will be switching the screw out while there is fluid in the system. Just remember to keep the reservoir cover on throughout this process, as keeping it on will keep the system mostly sealed and will keep the brake fluid from just pouring out once you remove the bleed screw. Be sure to be extra careful not to get this on anything and put a towel behind the bleed screw before you start to take it off to catch the brake fluid.
Quickly remove the bleed screw and replace it with the speed bleeder. Use a torque wrench to screw in the speed bleeder to the correct torque in order to avoid it from being too loose and leaking or to keep it from breaking off in your caliper which will be costly to repair. And presto! You can leave the speed bleeder on your bike and easily maintain your brake fluid at any time.
The Brake Bleeder Tool
Instead of using just a plain rubber tube for the project, grab one of these BikeMaster Brake Bleeder Tools, and attach it to the caliper. These little guys have a check valve in the middle of the tube that lets the brake fluid out without letting air in so you don't have to open and close the bleeder screw as you pump the brake lever. So just put one of them on and pump away till your brake fluid comes out nice and clear.
Brake Bleeding Vacuum Kit
The third type of tool that will make bleeding your brakes a piece of pie is a vacuum bleeder kit like this BikeMaster Vacuum Brake Bleeding Kit. Kits like this will come with a rubber tube that will attach to a catch can and then to a vacuum chamber and a hand powered pump. The tube will attach to the bleeder nipple as always and then you will use the pump to build pressure that will suck the brake fluid out of the system and down the hose. Once you open the bleeder screw, you'll notice that the fluid will begin to come out of the caliper without having to hold down the brake lever. You will have to still make a trip up to your handlebars every few moments to check the lever of fluid in the reservoir because you still don't want it to run dry.
After the fluid has be let out for a few moments, close the bleeder screw, remove the tube and do the same thing to the caliper on the other side (if your bike has two calipers on the front wheel). Continue to repeat this process until you see that the fluid is clear and contains no bubbles. Then you can top off the brake fluid and replace the reservoir diaphragm and cover.
Also there are lot's of "How To" video's on the WWW
The main two categories are drum brakes and disc brakes. Because the vast majority of brake systems today are disc brakes, that's what we'll be going over; but you'll still need to be able to tell the difference to make sure. In order to spot this type of brake, you'll be able to notice a "drum" mounted on the wheel of your motorcycle. If you can't seem to find this drum because it is either internal or combined with the rim of your bike, you'll just have to look for a brake disk. If there isn't one, your brake system operates off of a brake drum.
Disc brakes are a lot easier to work with as they are less likely to overheat and need less up-keep than drum brakes. You can easily spot these types of brakes by taking a gander at your wheel and spotting a metal disc mounted to the wheel, and a caliper attached to your forks or swingarm. Disc brakes can operate on both the front and rear wheels by using a system of pistons that are housed inside calipers which press the pads against the disc you spotted by your wheels. Many motorcycles have disc brakes on both the front and the rear, but some may only have them on the front wheel with drum brakes on the rear.
Because disc brakes are not protected by the drum, they're more subject to the elements. While this doesn't mean you can't ride in all conditions, it's always a good idea just to keep this is mind if you happen to get caught riding in the rain. And while disc brakes typically need less care, both drum and disc brakes require regular maintenance in order to work properly.
Brake System Maintenance
In order to keep your brakes from failing miserably right when you need them to work desperately, be sure to check them often. While you could have a mechanic check them every now and then, knowing what to look for yourself will help you make sure they're functioning properly, and learning how to service them yourself will save you a lot of money.
The first thing you will always want to do when checking your brakes is to check how thick the brake pads are. You don't want to wait until your brakes are gone and it's actually the metal backing of the pad and not the pad material that's slowing you down. If you let your brakes get that low, it'll damage your brake rotors and require you to change them out which will cost you precious ride time and a pretty penny. Instead, change your brake pads at the first sign that they're getting a little too low.
Changing your Motorcycle Brake Pads
You should check your owner's manual for specs on at what point brake pads should be changed (this is typically somewhere between 1-3mm.) Many brake pads will have vertical grooves in them to act as wear indicators that will show you when they need to be changed, Change out your brakes when one pad reaches the indicator even if the other isn't quite there yet. (Note: on some bikes you can slide the pad out to inspect it with the caliper still mounted. Check your owner's manual; if this is the case on your bike you can save yourself a lot of time.)
Locate the caliper that is attached to the rotor on your wheel. Before detaching the caliper, if there is a bolt holding the pads in place loosen it but don't remove it completely. Once it's loose, unscrew the bolts that are holding the caliper in place on the rotor and carefully slide it free. (Because the calipers are heavy, you don't want them to just dangle because they can easily scratch your rim; it's a good idea to tie it up with a zip tie to keep them under control.)
As the pads wear down, the pistons inside the caliper that push the pads onto the disc in order to stop your bike adjust slightly with them. Since there is less padding between the pistons and the disc, the pistons will have been pressed out of the caliper a little more than when the pads were first installed. Because of this, you'll need to push the pistons back into the caliper as much as possible in order to give the new pads enough room.
An easy way to do this is to insert a flathead screwdriver in between the pads before you remove them from the caliper and gently wiggle it so that the pads get pushed back further into the caliper and the pistons reset. Another way to do this is by using a C-clamp to push them back into place. You definitely want to avoid hitting the brake lever at all during this entire procedure as this will pop them back out!
Once the caliper is free from the disc and your pistons are pushed back, remove the pin that is holding the pads in place completely. Some of these pins will be held in place by tiny copper pins. If yours is, remove these pins with needle nose pliers first. Once the pin is out, there may be a retainer spring plate laying on top of the pads which will come right out and then allow you to slide out the brake pads. Some bikes will also have insulators or spacers that will go behind the brake pads in order to make the brakes quieter and reduce vibrations, so take note of them as well.
Now you can put the new brake pads into place, put the spring plate (if your bike had one in the first place) back over them and insert the pin back into the caliper. If you removed tiny copper pins, be sure to put them back in place as well. You may find it to be easier to apply a tad bit of grease to the pin before screwing it back in. Now that the caliper is all put back together, slide it back onto the rotor.
If it doesn't seem to fit back on the rotor, this is probably because you didn't push the pistons back far enough and you may have to remove the new pads in order to push the pistons far enough back into the caliper to allow enough room between the new pads for the rotor. After you get the caliper back in place, add some blue Loctite to the bolts that hold the caliper in place and reattach them to the rotor. Check your service manual as it may recommend tightening the bolts to a specific torque.
Right after you've finished the install, pump the brakes several times in order to make sure that they are back in their proper position. You'll then want to check the brake manufacturer for their recommended "bed in" procedure. It's important to bed in your brake pads to a clean rotor in order to prevent glazing and allow for the pads to mate properly with the rotor's surface. One standard way of doing this is to ride slowly at about 10-15 mph and do gradual and periodic stops. Increase the speed at which you stop at by 10 mph each time until you're going about 40-50 mph. Do this about two or three times to allow the brake pads to break in. After that, just remember to be particularly careful with your braking on your first ride out.
Brake bleed tools
Bleeding Motorcycle Brakes
No matter how new your brake pads are, a huge part of disc brake maintenance is bleeding the fluid in your brake system. Bleeding your brakes can be a pretty simple job that should be done at least once a year no matter how often you ride. There are a few different techniques and tools when it comes to this, so read through them and look for one you're comfortable with.
The process of bleeding your brakes can vary depending on the type of bike you're working on. Different models will have different types of brake systems and you should check with your service manual if you are at all unsure about how to go about the process.
Some Notes on Brake Fluid Attention: Use DOT 5 brake fluid on our BDM cycles
Brake fluid degrades over time and will become dark even if you haven't ridden all year long. And since this fluid is hydrophilic, it sucks moisture out of the air which will cause the performance of your brakes to deteriorate and make you lose pressure.
Always use a new bottle of brake fluid. While you think you just opened this last bottle, if it's more than a month old, the fluid inside the bottle will have already "expired" because it has been absorbing moisture in air the entire time it's been sitting, which can damage your brake systems and force you to do unnecessary maintenance. While buying a new bottle may make you spend a few extra bucks, it'll save you a lot more down the road when you don't wreck your brake system.
You'll also want to make sure that you buy the correct rating of brake fluid. Brake fluid comes in varying DOT standards from 3 to 5.1 which denotes at what point the fluid boils at. It's important to stick with the brake fluid that is recommended in your service manual.
The Standard Method
Brake fluid is highly corrosive and pretty nasty stuff, so make sure you have all the tools you'll need for the process by you before you get started. It can really do a number on motorcycle paint and your skin, so have a catch can and plenty of rags handy, along with some nitrile gloves on.
Use shop towels to cover up any areas you're concerned about spilling brake fluid, attach the end of the brake bleeder to the brake fluid nipple on your caliper. The brake bleeder should have an arrow pointing to the end of the tube that should be attached to the caliper. If the tube that you bought for this doesn't come with a catch, attach some kind of catch can or a plastic bag to the other side of the brake bleeder. An easy way to make sure it's secure is simply with a little tape.
Now that you can feel confident that the old brake fluid will make its way out of the cable without getting everywhere, head up to the brake fluid reservoir and remove the screws holding the cover and diaphragm in place on top of the reservoir. Try to keep the diaphragm attached to the cover and set them aside. With the cover off, you'll be able to see the fluid inside the reservoir.
At this point, if you are doing this whole process without the help of a brake bleeder, or any other tool that has a valve that will help you keep any air from sneaking up into your caliper, you might need to borrow the help of a friend here. In order to allow the brake fluid out while also keeping air out, you'll need to open and close the bleeder screw as you pump the brake lever. (If you don't have a friend to help, don't worry because we'll cover some ways to do this solo in the next section.)
Place your helper down by the caliper with the wrench attached to the bleeder screw in hand. You will then pump the brake in order to build up pressure in the brake system which will push the fluid out. As you pull the brake lever in, have your helper crack open the bleeder screw and let the fluid flow. Once a bit of the fluid has made its way into your catch can via the tube, have your buddy close the bleeder screw BEFORE you release the lever; if you release the lever while the screw is still open, it will suck air into your brake system.
Repeat this process a handful of times while keeping an eye on the amount of fluid in your reservoir. Never let your reservoir run empty as this will only let in air. Top the reservoir off with fresh fluid as it gets low. The longer you do this, the clearer the fluid that is coming out of your bike should look. You want to repeat this process until you're confident all the old brake fluid has been flushed out and only fresh fluid remains in the caliper, lines, and reservoir.
Keep an eye out for any bubbles in the fluid as it's pushed through the tube as well. You'll want to tap the brake line a few times as it runs from the reservoir to the caliper to help free any air in the line. It's always important to make sure that the fluid in your line has no air left in it; because air compresses but brake fluid does not, if there is any air in your lines at all it will cause your brakes to feel mushy and they will not function properly. Once the fluid is clear and free of bubbles, close up the bleeder screw for good and remove the drain tube from the caliper.
Tip: if you feel like air bubbles have made their way into the system and you can't seem to flush them, you can zip-tie or bungee cord the brake lever pulled in to open up the brake system and let it sit overnight. The air will gradually make its way up to the top on its own. The next day, you should be good.
If your bike has two calipers, you'll need to bleed both individually in order to flush the old fluid out of the brake line and pistons of each. Just repeat the same process on the other caliper until the fluid flowing out of it is clear and bubble free as well.
Once the calipers have been bled, you'll want to make sure the reservoir is topped off with fluid and then put the diaphragm and cover back in place. Be sure not to over fill the reservoir with fluid as this will put too much pressure on your brake system as the fluid heats up. Pump the brakes a few times to return brake pressure before you start riding.
The Rear Brake
While the process of this will be pretty much the same as with front brakes, you'll be bleeding out a different reservoir and master cylinder. You'll need to locate this part in order to get started. As always, check your service manual so you know where all the rear brake components are. Once you've found the master cylinder, the bleeding process itself is essentially the same.
Other Options
Of course, we don't always have friends around to help us out with our moto maintenance and some of us prefer to do our jobs solo. So technology has helped parts manufacturers to come out with a few handy hand tools that can make bleeding your brakes a one man job and a whole lot easier.
The Speed Bleeder
Speed bleeders are what I use, and they are an awesome little tool that will cheaply help you bleed your brakes without needing a friend is a speed bleeder like this Goodridge Brake Speed Bleeder. These tiny little tools replace the bleeder screw on the caliper and stay on your bike 24/7. You'll never notice a difference until you go to do the painful task of bleeding your brakes. These guys also have a check valve inside of them that lets the fluid out without letting air in which eliminates the need for a second body to open and close the bleeder screw.
To use them, just attach a simple rubber tube with the catch can, open the speed bleeder by turning it a quarter-turn, and pump the brake lever. When your fluid has been completely flushed, just close up the speed bleeder, remove the tube, top off the reservoir, replace the reservoir cover and be on your merry way after pumping the brakes a few times to return pressure. Sizes will vary depending on the bike so check the size of your bleeder screw and buy the speed bleeder accordingly.
When installing a speed bleeder to your bike, it's always better to do it on a brake system that is already full of fluid. When installing them, a very small amount of the brake fluid will leak out because you will be switching the screw out while there is fluid in the system. Just remember to keep the reservoir cover on throughout this process, as keeping it on will keep the system mostly sealed and will keep the brake fluid from just pouring out once you remove the bleed screw. Be sure to be extra careful not to get this on anything and put a towel behind the bleed screw before you start to take it off to catch the brake fluid.
Quickly remove the bleed screw and replace it with the speed bleeder. Use a torque wrench to screw in the speed bleeder to the correct torque in order to avoid it from being too loose and leaking or to keep it from breaking off in your caliper which will be costly to repair. And presto! You can leave the speed bleeder on your bike and easily maintain your brake fluid at any time.
The Brake Bleeder Tool
Instead of using just a plain rubber tube for the project, grab one of these BikeMaster Brake Bleeder Tools, and attach it to the caliper. These little guys have a check valve in the middle of the tube that lets the brake fluid out without letting air in so you don't have to open and close the bleeder screw as you pump the brake lever. So just put one of them on and pump away till your brake fluid comes out nice and clear.
Brake Bleeding Vacuum Kit
The third type of tool that will make bleeding your brakes a piece of pie is a vacuum bleeder kit like this BikeMaster Vacuum Brake Bleeding Kit. Kits like this will come with a rubber tube that will attach to a catch can and then to a vacuum chamber and a hand powered pump. The tube will attach to the bleeder nipple as always and then you will use the pump to build pressure that will suck the brake fluid out of the system and down the hose. Once you open the bleeder screw, you'll notice that the fluid will begin to come out of the caliper without having to hold down the brake lever. You will have to still make a trip up to your handlebars every few moments to check the lever of fluid in the reservoir because you still don't want it to run dry.
After the fluid has be let out for a few moments, close the bleeder screw, remove the tube and do the same thing to the caliper on the other side (if your bike has two calipers on the front wheel). Continue to repeat this process until you see that the fluid is clear and contains no bubbles. Then you can top off the brake fluid and replace the reservoir diaphragm and cover.
Also there are lot's of "How To" video's on the WWW
Last edited:

francoblay1
The Spaniard
some more reading:
http://www.bigdogbiker.com/threads/brakes.48828/
http://www.bigdogbiker.com/threads/changing-rear-brake-pads.12818/#post-187977
Old but its all I could find....
RIP "Old Hippy"

http://www.bigdogbiker.com/threads/brakes.48828/
http://www.bigdogbiker.com/threads/changing-rear-brake-pads.12818/#post-187977
Old but its all I could find....
RIP "Old Hippy"

francoblay1
The Spaniard
Problem is since the software update we lost all the pics on the old threads.I have a How-To thread with pictures called Advanced Maintenance
Sent from my XT1254 using Tapatalk
http://www.bigdogbiker.com/threads/advanced-maintenance.30448/


BWG56
Guru
I don't know about the 05' but my 07' has synthetic dot-5 which does not absorb moisture like the dot-3 &4 and therefore would not need flushed like the older fluid.Read the service manual,then read it again. It's a fairly simple job and according to the age of your bike,you may want to flush the brake fluid.
Read the service manual? a little harsh there buddy,


FrankBDPS
Well-Known Member
That's kind of what I thought too. I wonder if the origional poster ever got it done?Umm. Huge thread.
To change pads you pull the cotter key and slide out the pads.