rschubel1957
Active Member
how do i post pictures it says file to large?


Take a scissors and cut it down,how do i post pictures it says file to large?
 I couldn't help myself


")


Try punching your screen really hard, that works for me sometimes..Thanks Franco ..but you got to be f...ing kidding you lost me.im lucky I can turn a computer on

It´s fucking easy... if you don´t want to do ALL of the above... just right click on the pictures and send them to a mail, there a small window will pop-up where you can choose between, small, mediu, large or original pic size... email them to yourself. Done.Thanks Franco ..but you got to be f...ing kidding you lost me.im lucky I can turn a computer on
I email them to myself and download them on my computer, then up load them on the forum. I like to keep a file for pics anyway.
That's how I also do it from my IphoneIt´s fucking easy... if you don´t want to do ALL of the above... just right click on the pictures and send them to a mail, there a small window will pop-up where you can choose between, small, mediu, large or original pic size... email them to yourself. Done.

 it worked your a F..ING genius Franco thanks
That I might be able to do.punching the screen don’t work done that before
If the pics are on your phone ya could try throwing it also. My head is spinning! Lost me too.How to Resize Multiple Pictures in Windows 7, 8, 8.1 and 10 without Special Software
Tip: It is easier if all the photos you want to resize are located together in one folder.
1. Right-click on the desktop.
2. Go with the mouse cursor (pointer) to "New" and then click on "Folder".
3. Type a name for the new folder, such as "photos", "resized pictures", "resized images", "smaller pictures" or whatever name you want (name does not matter much).
4. Go to the photos you want to resize.
5. Select all the pictures at once.
Two ways to select multiple images at once:
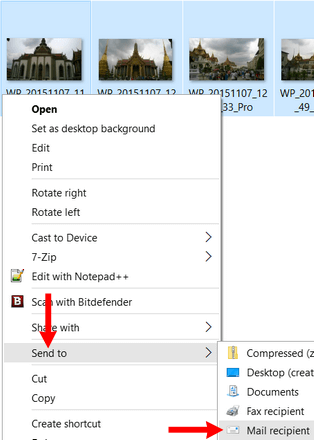
6. Right-click on the selected images.
- Press the [CTRL] and [A] key on your keyboard.
- Click on the first photo, press and hold the [SHIFT] key of your keyboard and then click on the last photo.
7. Go with the mouse cursor (pointer) to "Send to" and then click on "Mail recipient".
8. A small "Attach Files" window will appear and here you will have to choose a picture size (dimension), like 640 x 480, 800 x 600, 1024 x 768 or 1280 x 1024.
Note: The aspect ratio of your photos will be correct. For example, if you choose 800 x 600, then a photo with a size of 1280 x 720 will still get the correct aspect ratio of 800 x 450.
The 'aspect ratio' of a picture describes the proportional relationship between the picture's width and its height.
9. Click on "Attach".
10. Windows will now try to open an email program like Outlook or Thunderbird and if you don't have a email program, then you will get an error message that says that there is no email program associated to perform the requested action etc... It's okay, no problem, because we don't need an email program. Don't click on "OK" and don't close this message window yet.
11. Go to the Windows search bar.
Tip: In Windows 7, 8 and 8.1, you can find the search bar in the start menu and in Windows 10 it's located in the taskbar. In Windows 8, 8.1 and 10, you can also open the search function by pressing the [Windows] +key on your keyboard.
12. Type %temp% into the Windows search bar.
13. Press Enter.
Now the Windows "Temp" folder will open and here you will see the resized pictures.
Note: If the search doesn't work and/or the Temp folder doesn't open, then follow the next few steps:
- Open Windows Explorer or File Explorer (Windows 10)
- Open Local Disk (C
- Open Users
- Open the folder with your username (e.g. Peter)
- Click on View located at the top.
- Check (select) Hidden items
- Open AppData
- Open Local
- Open the Temp folder
14. Go with the mouse cursor (pointer) to the left sidebar and click next to "Desktop" on the ❱ or ▷ icon, so that the new folder (which you previously created) appears.
15. Drag the photos from the "Temp" folder to the new folder.
To drag, click with the left mouse button on the photo(s), hold down the left mouse button, drag the image(s) to the new folder and then release the left mouse button.
When all the resized pictures are in the new folder, you are done.
See post #13.My head is spinning! Lost me too.

